
Lacerations and Wound Repair
This guide is dedicated to all the patients who so generously agreed to allow their care to be imaged for the purpose of teaching other health care providers. We are very grateful to all of you!
(Last Revised: July 11, 2020)
Since life is inherently subject to accidental misfortune, methods for the repair of physical trauma have been documented throughout most of recorded history. There is mention of washing and bandaging in a Sumerian tablet created sometime around 2100 B.C. (there is even detailed description of payment to be made for services rendered in Hammurabi’s Code, circa 1300 B.C.!). Egyptian papyri with mention of medical treatment date from the Kahun (1900 B.C.), and include the amazing Edwin Smith Papyrus (c.1700 B.C.),which is organized in anatomic fashion with diagnoses divided into “An ailment which I will treat”, “An ailment with which I will contend”, and “An ailment not to be treated.” The treatments are generally surgical in nature, and include mention of stitching, cautery, bandaging, splinting of fractures, reduction of dislocations, and application of unguents. Examples of suturing have been found on the body of an embalmed mummy from about 1100 B.C. Ancient Hindu literature mentions using the mandibles of ants whose bodies have been separated from their heads as a means of wound closure – the first use of a surgical stapler! And the list goes on. [1][2]
It is clear that some principles of wound management have been known and practiced for millennia, and though science and technology have made considerable advances over time, the application of some common sense principles and techniques remain valuable in the care of our patients today. This section will review the approach to caring for some of the common surface trama encountered in the Emergency Department, with special attention to the repair of a typical laceration.
Background
Anatomy, Bacteriology, and Physiology of the Skin:
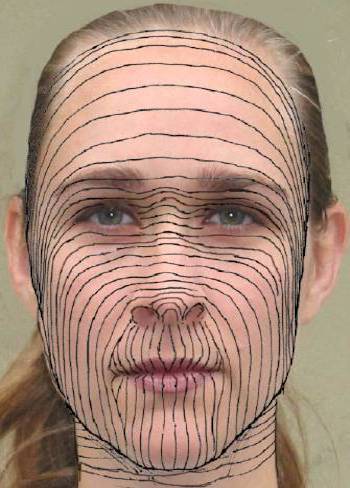
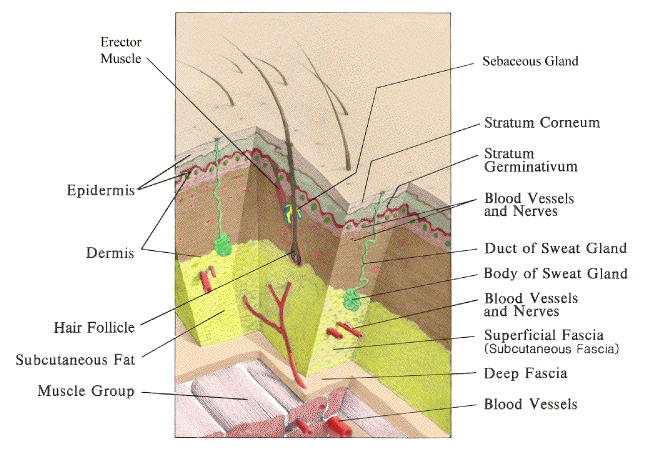 |
| Skin Anatomy. Adapted from Wounds and Lacerations: Emergency care and Closure. Alexander Trott, M.D. Mosby, 1991 |
A. Bacteriology of Skin
1. The epidermis is stratified squamous epithelium with outer horny layer of dead cells. It ranges in thickness from 0.075-0.15 mm (most of the body) to 0.4-0.6 mm (palms and soles).
a. Bacteria reside in dead horny layer, in fairly low (less than a hundred to a few thousand per sq. cm) numbers over most of the body.
b. HOWEVER, the following have high bacterial populations (approximate numbers per square centimeter):
1. Nail folds – 10,000 – 100,000
2. Axillae – 1,000,000 – 100,000,000
3. Scalp – 1,000,000 – 10,000,000
c. Major organisms in most areas are staphylococci and diphtheroids; Corynebacterium acnes is major organism in sebum-rich areas. Gram-negatives are rare everywhere, though some are found in the intertriginous folds.
d. Stratum corneum at base of horny layer provides effective bacterial barrier and is essentially waterproof.
2. Pilosebaceous appendages and apocrine and eccrine glands descend into the dermis.
a. Bacteria are found in the follicles, but usually only as deep as the sweat ducts.
b. The sebaceous, eccrine, and apocrine glands themselves are normally sterile, with the exception of acne-prone areas, where Corynebacterium is frequently found in the sebaceous gland ducts (but not the glands themselves).
c. The dermis ranges in thickness from 1-4 mm.; it Is thickest on the back, and is progressively thinner at the thigh, abdomen, forehead, wrist, scalp, palm, and eyelid.
d. In many areas the collagen bundles tend to be oriented in one direction, giving rise to lines of static skin tension.
e. The dermis is normally sterile.
B. Biomechanical Properties of Skin
1. The tensile strength of intact rat skin is about 1800 lb/sq in. That of human skin is somewhat less, perhaps 300-500 lb/in2
2. The vascular supply of the stratum papillare is configured as a richly anastamosed dermal plexus. In most areas of the body this plexus can supply adequate circulation for at least 1/2 cm laterally (important in determining viability of a skin flap).
3. The skin has a resting, or static, tension, which varies widely from person to person and from one area of the body to another. In some areas, static skin tension pulls evenly in all directions, while in other areas it is quite directional.
4. Dynamic skin tension refers to stresses placed on the skin by motion. There is large dynamic skin tension in areas such as the extensor surface of the knee, and small dynamic skin tension in areas such as the anterior chest.
5. While dynamic skin tension plays a role in the acute failure of a wound repair, static skin tension is primarily responsible for the ultimate width of a scar. A wound perpendicular to the line of maximal static skin tension is likely to produce a wide scar.
C. Physics of Wounding
There are three major types of forces which cause tissue injury: shear, compression, and tension:
1. Shear is caused by a small total energy applied symmetrically to a very small volume of tissue, e.g. a scalpel wound. There is very little tissue injury beyond the physical separation of the wound edges. Shear-type wounds have a low potential for infection, generally requiring over 100,000 organisms per gram of tissue to produce clinical infection.
2. Compression involves energy distributed over a much greater volume of tissue and requires the absorption of a far greater total energy in order to produce tissue failure. There is, therefore, much greater tissue injury, and a much higher potential for infection, requiring only 1000 organisms per gram of tissue to produce infection. A classic example of this injury is the stellate laceration caused by a blunt object striking the skin at 90 degrees to the skin surface.
3. Tension type wounds are intermediate between shear and compression in terms of the energy required to produce tissue failure and the degree of tissue damage. The entirety of tissue damage caused by a tension injury is often not immediately evident. The mechanism is a blow by a bunt or semi-blunt object at an angle of less than 90°.
D. Physiology of Wound Repair
The following sequence occurs (at least, sequential in some times of onset; these actions take place in a continuum in real life):
1. Wound occurs, followed by local tissue retraction and vasoconstriction
2. There is hemorrhage into the wound, with the development of a clot and then a fibrin framework.
a. The clot DOES NOT protect the depth of the wound from dehydration.
b. It DOES provide reasonable temporary protection against the entry of foreign material and bacteria.
c. The clot DOES NOT act as a ‘scaffolding’ for wound repair; in fact, the presence of a solid clot actually inhibits wound repair.3. An inflammatory reaction of greater or lesser degree develops.
a. Platelets interact with local mediators to initiate the cellular component of the process. Prostaglandins are probably involved in this interaction. The process will not proceed in the absence of platelets.
b. PMN’s enter the wound within several hours:1. They are the keys to healing of infected or grossly contaminated wounds.
2. They are NOT necessary for clean wounds to heal.
3. If there is no infection, they reach a numerical peak within 24 hours and rapidly decline thereafter.c. Macrophages enter the wound as monocytes beginning within several hours. They reach a peak within 2-3 days, and remain in the wound in significant numbers for three weeks. Macrophages are required or proper wound healing. Healing will be greatly delayed and will be abnormal in the absence of macrophages.
d. Fibroblasts and capillaries appear by 24 hours, are maximal at about 10 days, and then decline; the very cellular granulation tissue becomes a relatively acellular scar.4. At six hours, the epithelial cells at the wound edge begin to accumulate glycogen.
5. At 12 hours, increased mitosis is seen in the basal layer of the epithelium, and epithelial cells at the wound edge begin to migrate into the wound:a. If the clot is moist, the epithelial cells migrate through it.
b. If the clot is dry, they migrate under it.
c. The migrating epithelial cells will travel through collagen, but will not invade granulation tissue; they travel over it.
d. Epithelium over granulation tissue (and ultimately over scar) is generally thinner than elsewhere.
e. Also, it is less firmly attached to the underlying scar, since the normal epidermal-dermal architecture (‘rete pegs’) is abnormal.6. Deeper fibroblasts (myofibroblasts) contract, helping to close the wound.
7. At 24-30 hours, proliferative connective tissue is first seen, and follows an orderly progression:a. Macrophages advance through the organizing clot/fibrin;
b. Endothelial buds follow the macrophages;
c. These buds mature into an abundant growth of new vessels;
d. More specialized collagen-producing fibroblasts follow the developing capillaries into the healing wound;
e. As collagen is laid down, many of the new capillaries involute, leaving a denser, less cellular, less vascular tissue.8. The developing collagen organizes and alters its architecture, producing a progressive increase in tensile strength.
a. However, the developing scar NEVER develops normal collagen bundles.
b. Tensile strength at 40 days is only about 50% normal.
c. Tensile strength at one year is about 70-90% normal, and that’s as good as it ever gets.
E. Key Variables Beyond the Wound Itself
1. Presence or absence of infection
2. Presence or absence of foreign bodies/material
3. Oxygenation of perfusing blooda. Fibroblasts reproduce best in an environment in which the pO2 is between 30-50 mm Hg. There is almost no fibroblast mitosis if the pO2 is less than 25 mm Hg.
b. Collagen synthesis and crosslinking, however, occur best at a pO2 of 20-30 mm Hg.
c. Since the cells at the edge of the wound are more concerned with mitosis and the cells at the center of the healing wound are more involved with collagen synthesis, and since the cells at the wound edge are able to extract oxygen from blood more effectively, this works out pretty well.
d. Epithelial regeneration occurs effectively over a wide range of oxygen tensions, and is also able to proceed fairly well by use of glycolysis.
e. Increasing the FIO2 can produce a modest increase in wound pO2.4. Perfusion
a. The healing wound is exquisitely sensitive to even mild shock. Degrees of hypovolemia which do not cause clinical signs of shock in the animal as a whole produce a prompt decrease in perfusion through developing capillary beds. This decrease in perfusion is profound and lasts much longer than the hypovolemia and may be associated with a decrease of tissue pO2 in the wound to almost zero.
b. Unfortunately, fluid overload is also disproportionately harmful to the healing wound. The new capillary beds are quite ‘leaky’ and will allow tissue edema to develop in the wound microenvironment at a hydrostatic pressure which would not cause edema elsewhere.
| Technical Factors | Anatomic Factors | Associated Conditions | Medications |
| Inadequate wound preparation (debidement, cleansing) | Static skin tension | Age | Corticosteroids |
| Excessive suture tension | Dynamic skin tension | Diabetes | NSAIDs |
| Reactive suture material | Pigmented skin | Renal, hepatic Failure | Penicillamine |
| Local anesthetics | Oily skin | Alcoholism | Colchicine |
| Irrigant solutions | Body region | Ehlers-Danlos or other connective tissue disorder | Anticoagulants |
| Keloid formation* | Hypoxia (including severe anemia and PVD) | Antineoplastic Agents | |
| Malnutrition (esp. Vit C deficiency) | |||
| Severe immunocompromise |
*Keloids are distinguished from hypertrophic scars by the fact they extend beyond the original confines of the wound; hypertropic scars, though they may project above the normal skin surface, are limited in extent to that of the original injury.
F. The interval between wounding and repair
- frequently cited as a decisive factor when considering primary closure of the simple wound
- some advocate delayed management with serial dressing changes and secondary closure of all wounds presenting after a “golden period” ranging from six to 24 hours after injury
- others recommend repair with little regard to timing if the wound is clean and clinically uninfected
- in animal model studies, four-day delay of closure of experimental wounds in rats postponed development of wound strength equivalent to controls until only the seventh day after wounding
- one report from the developing world showed a statistically significant difference between the non infected healing of wounds closed prior to 19 hours after wounding compared to those closed after 19 hours – 92% versus 77%, respectively. This “golden period” of 19 hours applied only to wounds involving areas other than the scalp and face, as more than 90% of the latter healed regardless of time from injury to repair..[16]
- the finding that late-presenting wounds have a statistically significant higher rate of infective complications does not necessarily contraindicate immediate closure
- delayed management of a late presenting wound is similar to that of infected wounds and consists of serial dressing changes, antibiotic administration, and closure several (usually 4 or more) days later – a “delayed primary closure.”
The take home message is that the approach to the closure of any wound needs to be individualized and based upon a number of factors – the time from wounding, the mechanism of injury, the amount of tissue destruction, the degree and type of wound contamination, the wound location (across a joint, on weight bearing surface, cosmetic significance, etc.) and a number of host factors, including nutritional status, age, and immunocompromise.
G. Local factors affecting wound care
- Body location, mechanism of injury, and degree and type of contamination have all been shown to influence the prognosis of the healing wound. Clinical studies have found a higher rate of uncomplicated healing for wounds on the head and neck compared with the extremities. Wounds involving the trunk have been observed too infrequently for meaningful analysis.
- Closure of guinea pig wounds containing devitalized fat, skin, or muscle resulted in a higher incidence of gross infection than in controls, supporting the hypothesis that necrotic tissue not only enhances bacterial growth, but inhibits killing of phagocytosed organisms.
- “Inert” foreign bodies also increase the risk of infection in wounds undergoing suture repair. Seeding guinea pig wounds with small amounts of soil containing montmorillonite, a common mineral, reduced the number of bacteria necessary to cause infection from 106 to 103
- Data relating to the effect of interval from injury to repair on healing of simple wounds are scant. A study of hand wounds repaired up to 18 hours after injury found no benefit for early over late closure. Other reports considering the significance of this interval have included too few late-presenting wounds to draw meaningful conclusions. In the same study mentioned above, done in the developing world (where many wounds are late-presenting), although infection was significantly more frequent in wounds presenting after 19 hours, more than 75% of wounds closed more than 48 hours after injury still healed uneventfully.[16]
- Decisions on closure should be based on a careful assessment of wound and host factors and the potential consequences for the patient should wound infection occur!
H. Initial Steps in Wound Care
- Make the patient comfortable, preferably supine on a stretcher.
- Stop active bleeding with simple pressure or compression dressings; do not do any blind clamping.
- Remove any rings or jewelry from injured hands or fingers.
- Remember to consider pain relief; parenteral analgesics if needed, long acting local anesthetics if repair will be lengthy or delayed – do not let a patient linger for long periods of time with significant discomfort.
- If a delay before repair is likely, cover the wound with saline soaked gauze to prevent drying; if the wait will be longer than an hour, clean and irrigate the wound before dressing it; if longer than 2 to 3 hours, consider early use of antibiotic prophylaxis.
- Wounds are cleaned by irrigation and/or direct removal of foreign material, not by soaking. Proper irrigation reduces bacterial contamination and helps prevent infection, because any soil or small foreign bodies that remain reduce the number of bacteria required to produce infection. Although the optimal irrigation pressure is unknown, most authorities recommend high-pressure irrigation, with impact pressures on the wound in the range of 5 to 8 lb. per square inch. This pressure may be achieved by using a 35- or 65-ml syringe and a 16- to 19-gauge needle. The recommended volume of irrigation is 50-60 cc/cm of laceration length.
- Use special care with children; use sedation or topical anesthetics if available and appropriate; allow the parents to remain with the child if they are tolerating the procedure without problems.
- Obtain pertinent medical history, including mechanism of injury, time of injury, medication history, history of immunocompromise, (steroid use, diabetes, AIDS, etc.), allergies, tetanus status.
- Obtain and review all 4 vital signs; perform a rapid general survey of the patient as well as a detailed exam of the injured area.
I. Selecting the appropriate material
Nonabsorbable Sutures:
1) Silk may remain unchanged in patients for up to 20 years, will undergo a gradual decrease in tensile strength, multifilament, dyed and waxed, has good tensile strength (surpassed only by synthetic nonabsorbable materials and metal wire), handles well because of its pliability and excellent knotting characteristics; used infrequently since the advent of synthetic sutures
2) Nylon and polypropylene have many useful characteristics; both are generally available as monofilament sutures with excellent tensile strength & have a low coefficient of friction. On the down side, this low coefficient of friction, combined with a relative stiffness, makes it difficult to tie secure knots except by using multiple loops. Physicians use these sutures widely for skin closure as well as in cardiac and vascular surgery.
3) Dacron is a polyester fiber with sustained strength and good handling characteristics; it comes as a multifilament suture and may be coated or uncoated. Coatings may be silicone, polybutylate, or Teflon. While knotting will be more secure with uncoated suture, coated versions slide through tissue more easily. Dacron’s widest application is the suturing of nerves and tendons in addition to synthetic grafting and vessel anastamoses.
Absorbable Sutures:
1) Catgut is manufactured from animal protein in either plain or chromic versions. This latter process provides greater strength. As a rule, catgut knots relatively securely and handles well, but it has erratic tensile strength and absorption, in addition to provoking a relatively pronounced tissue reaction. The major clinical use of catgut is in areas where a brief duration of suture persistence is desired.
2) Polyglycolic acid (Dexon) and polyglactin (Vicryl) sutures are two excellent synthetic absorbable sutures. Though chemically distinct, both materials have similar advantages. They handle well, knot securely, and have tensile strength greater than silk or catgut, though less than dacron. Absorption and loss of tensile strength occur predictably, and tissue reaction is minimal. Clinically, most investigators agree that both these synthetic sutures can and should replace catgut in most cases.
Staples:
Staples provide by far the most secure method of skin closure. Application is both rapid and simple, but they do require special instruments both for placement and removal. Theoretically, they can be used at nearly any site, but in some locations, they may be cosmetically unappealing.
Tape:
Microporous adhesive skin tapes (Steri-strips, etc.) prove useful as a rapid closure method. They also obviate the need for anesthesia and avoid the microwounds associated with suturing. Disadvantages include both the possibility of accidental or premature removal and the inversion of skin edges if the strips are not meticulously applied. In addition, prior to using skin tape, the surrounding tissue must be cleansed, defatted with alcohol or acetone, dried, and then coated with tincture of benzoin compound or an equivalent such as Mastisol. Has its greatest utility on the relatively lax skin of the face and abdomen since the taut skin of the extremities, combined with joint motion, limits adherence.
Octylcyanoacrylate Adhesive (Dermabond):
There are two tissue adhesives available in the U.S. for wound repair – n-butyl-2-cyanoacrylate (Histoacryl Blue, PeriAcryl) and 2-octyl-cyanoacrylate (Dermabond, Surgical). Their effective strength is about that of 4- or 5-0 nylon. They should not be allowed to get into the wound itself, as it is not reabsorbed and can act as a foreign body. Make sure the edges are appropriately aligned and that you’ll not be gluing gauze, glove, or other foreign material to the wound before you start. The skin edges are approximated, then it is “painted” on in 2-3 thin layers. Standard wound preparation is advised. Contraindications include any preexisting evidence of infection, any bite, puncture, stellate, or crush wound, a wound across a mucocutaneous junction or on a mucous membrane, in areas that will inevitable get repeatedly wet after the repair, or in high tension areas (e.g., crossing joints). Adhesives are best used in clean linear wounds that are not under tension.
Characteristics of Absorbable and Nonabsorbable Sutures
|
Type of Suture (Trade Name) |
Degree of Knot Security |
Tensile Strength |
Duration of Wound |
Tissue Reactivity |
| ABSORBABLE | ||||
|
Surgical gut |
Poor |
Fair |
5-7 days |
Most |
|
Chromic gut |
Fair |
Fair |
10-14 days |
Most |
|
Polyglactin (Vicryl) |
Good |
Good |
30 days |
Minimal |
|
Polyglycolic acid (Dexon) |
Best |
Good |
30 days |
Minimal |
|
Polydixanone (PDS) |
Fair |
Best |
45-50 days |
Least |
|
Polyglyconate (Maxon) |
Fair |
Best |
45-50 days |
Least |
| NONABSORBABLE | ||||
|
Nylon (Ethilon) |
Good |
Good |
N/A |
Minimal |
|
Polypropylene |
Least |
Best |
N/A |
Least |
|
Silk |
Best |
Least |
N/A |
Most |
*This column indicates the period during at least 50 percent tensile strength is retained.
J. There are four major concerns associated with wound closure:
1. Avoiding infection
• Clean surrounding skin thoroughly
• Remove all dead, necrotic, and foreign material from the wound itself
• Thoroughly irrigate the wound (sterile saline is most commonly used, though some advocate using solutions such as 1% povidone solution – remember that stock solutions are 10% povidone. Never use undiluted povidone, povidone scrub solution, or undiluted Hibiclens/Chlorhexidine in wounds- they are too toxic to tissues.
2. Minimizing tissue reaction
• Don’t use irritating or caustic materials in cleaning wounds (see above).
• Any foreign material in a wound increases local inflammation – including sutures. Catgut causes the most inflammation, with less intense, but by no means insignificant, tissue reactions with the use of silk, cotton, and dacron. Nylon, polypropylene, synthetic absorbable sutures, and metal cause little to no tissue reaction. In contrast to catgut, polyglycolic acid and polyglactin sutures absorb by simple hydrolysis. Any monofilament suture will cause less secondary infection and inflammation than a multifilament suture.
3. Avoiding unnecessary scarring
• The first priority is to adequately approximate the tissue without tension, infection or ischemia.
• Secondly, skin edges should be everted.
• Line up old landmarks (vermilion border or white band at the lip, old scars, birthmarks, etc.)
• Choose the least reactive appropriate suture material whenever possible. Percutaneous sutures stimulate a granulomatous, then fibrous inflammatory reaction along the suture tract. From each point of penetration, the epidermis grows as a tube surrounding the suture. Non-reactive sutures, such as nylon or staples, removed early in the process of healing and replaced by skin tape, prevent intense tissue reaction, allow for the absorption of the epithelium, and diminish scarring. Leaving sutures in longer than 10 days increases the risk of a “railroad track” appearance. Subcuticular synthetic absorbable sutures or skin tapes cause even less scarring.
4. Providing wound closure security
• The strength of the wound closure depends least on the tensile strength of the material used and most on the adequacy of the healing process and the ability of the material to maintain its placement position and its knots. Initially, the tensile strength of almost any wound closure material exceeds that which is necessary so long as the wound is not under excessive tension. In fact, skin sutures will more likely pull through the skin than break. However, in the subcutaneous tissue, erratic absorption makes catgut less dependable in maintaining its initial tensile strength after tissue implantation, but synthetic absorbable sutures maintain adequate tensile strength reliably for 30-60 days.
• Relative to placement security, braided synthetic absorbable sutures knot as well as silk, cotton, and dacron. Lesser knot security will be found with catgut and monofilament nylon and polypropylene. Of course, metal staples and skin clips provide the greatest placement security. Skin tapes are least reliable, not so much because of their inherent tensile strength characteristics, but because of their tendency to dislodge when wet. Defatting the tissue and preparing the skin with tincture of benzoin or Mastisol (gum mastic in ethanol) may reduce this problem somewhat.
• Given that prevention of contamination, secure tissue apposition, (while maintaining blood flow), and placement of the minimum necessary number of sutures are universally agreed upon as guiding tenets of wound closure, layered closure and elimination of dead space have been advocated to reduce the probability of infective complications by decreasing hematoma formation and eliminating a devascularized potential space as a nidus for infection. Sterile technique is also emphasized in traditional teaching of wound care. Clinical and experimental observations shed some interesting light on these orthodox doctrines of wound care:
The risk of infection in nonvascularized space or hematoma after wound closure has spurred recommendations to obliterate dead space in contaminated wounds by performing layered suture closures. This practice is questionable. The effect of layered closure on the incidence of infection in contaminated wounds has been studied specifically in both animal model and clinical studies. In animals the incidence of infected wounds was consistently proportional to the number of suture layers; and leaving dead space resulted in lower rates of infection than obliterating it with sutures. In human beings, a randomized study of abdominal laparotomies found that a subcutaneous “fat” stitch failed to reduce infection rates; and placement of subcutaneous sutures resulted in a significantly higher rate of wound infection in a trial of routine antibiotic prophylaxis as an adjunct to care of simple wounds. Deep, absorbable sutures may be placed to repair periosteum, muscle, or fascia, or to minimize tension on skin sutures. In most wounds, however, leaving potential dead space appears preferable to attempting to obliterate it.The importance of sterile surgical technique to the healing of simple wounds has been evaluated in several clinical studies. Comparisons of sterile-gloved to clean technique have been equivocal or demonstrate no significant difference in the infection rate between the use of sterile versus clean nonsterile disposable gloves.[3][4][9] In a small series there was no advantage to donning surgical masks. These observations suggest that ensuring a nonischemic wound environment free of blood, necrotic tissue, soil and other debris may be more important to uncomplicated healing of small wounds than avoiding the introduction of small numbers of bacteria by fastidious attempts to preserve a sterile environment for wound repair.
K. Local Anesthesia
• The subcutaneous injection of lidocaine is among the safest procedures in emergency medicine. In the absence of idiosyncratic reactions, the frequently cited maximum dose of 4 to 7 mg/kg appears virtually completely safe, as there are probably no genuine cases of dose-dependent fatalities from lidocaine infiltration for repair of simple wounds. Topical use of lidocaine has caused fatal reactions when prescribed in large doses for mucosal anesthesia in healthy adults, or with smaller doses in children and older adults. Fatalities also have been reported after nerve blocks and regional anesthesia induced with lidocaine.
• Epinephrine is added to lidocaine preparations to increase the duration of anesthesia, to promote hemostasis, and to reduce systemic absorption of lidocaine. Patients on ß-blockers in whom alpha receptor stimulation is unopposed are prone to hypertensive crisis when anesthetic solutions containing epinephrine are injected. In such patients, epinephrine is therefore relatively contraindicated. Epinephrine also minimally increases the incidence of infection in contaminated wounds; epinephrine should therefore not be used simply to enhance anesthesia in contaminated wounds.
• Patients who relate a history of lidocaine “allergy” may have had vasovagal or other side effects misdiagnosed as “allergic”. The patient should be questioned carefully about the circumstances surrounding the reaction. If an allergy to lidocaine, an amide, is confirmed or strongly suspected, use of one of the ester group of local anesthetics, such as procaine, is suggested (see table 1). Cross-reaction between the two groups is extremely rare. Patients with an allergy to one of the esters may need to be anesthetized with a cardiac or a preservative free unit dose preparation of lidocaine (e.g. ampules used in dentistry), as the formulations for local anesthesia usually contain the preservative methylparaben, itself an ester. Although a negative skin test appears to rule out an allergy to local anesthetics, false-positive tests are not uncommon. Another approach might be to use one percent diphenhydramine (Benadryl) for infiltration as an alternative local anesthetic agent.[6]
|
Amides
|
Esters
|
| Lidocaine (Xylocaine, Lignocaine) | Procaine (Novacain) |
| Mepivacaine (Carbocaine) | Chlorprocaine (Nesacaine) |
| Bupivacaine (Marcaine) | Tetracaine (Pontocaine, Amethocaine) |
| Dibucaine (Nupercainal, Cinchocaine) | Cocaine |
| Etidocaine (Duranest) | Proparacaine (Alcaine) |
| Prilocaine (Citanest) | Dyclonine (Dyclone) |
| Benzocaine | |
| Cetacaine ( benzocaine 14%, tetracaine 2%) |
N.B.: The simple precaution of injecting while the patient is supine should eliminate the most common complication of local anesthesia by subcutaneous injection – hypotension or syncope secondary to a vasomotor (vasovagal) reaction!
• Attention to the technique of administration minimizes the pain attending infiltration anesthesia. Applying pressure to the site undergoing injection, injecting slowly, anesthetizing as much tissue as possible through a single site, and on extremities starting proximally and moving distally reduce patient discomfort. Use of a 30-gauge needle for subcutaneous injection is also advisable. Although injecting from within the wound is less painful than injection of subcutaneous tissue through intact skin, the latter is preferable when the simple wound is untidy and contamination of adjacent tissue is likely. Buffering of local anesthetics, manufactured with an acidic pH to enhance shelf-life, may significantly reduce patient discomfort. A pH close to physiologic is attained by adding 1 mL of sodium bicarbonate solution to each 10 mL of 1% lidocaine or mepivacaine (adding more than about 0.2 ml of bicarb to 10 ml of bupivicaine will cause the solution to form a precipitate).[6][7]
• Topical Tetracaine, Epinephrine, Cocaine – “TAC” was the original of the topical anesthetic preparations which are an attractive alternative to injection, particularly for pediatric patients with simple wounds. The most common preparation is a combination of tetracaine 0.5%, epinephrine (adrenaline) 1:2000, and cocaine 11.8%. Because there is no commercial preparation, hospital pharmacies must prepare the solution. The inclusion of cocaine in the preparation, with its attendant expense and toxicity, has been a drawback to the widespread adoption of TAC.
• LAT (or LET), which substitutes the less toxic lidocaine for cocaine, is less expensive and has been found to be as effective as TAC. Generally, 4% lidocaine (or 2% viscous lido) and 1:2,000 epi and 1%tetracaine are used in this preparation.
• Those contemplating use of TAC for anesthetizing children’s wounds prior to suture repair must recognize the potential for toxicity, especially with application to mucosal surfaces or in areas that can be reached by children’s mouths. Taking steps to ensure that TAC is administered properly, washing the repaired wound with soap and water after the repair, and placing a dressing on extremities seem reasonable steps to ensure safe administration. LAT, on the other hand, can be used safely in reasonable amounts (remember lidocaine absorption and its potential toxicity) on mucosal surfaces.
|
Technique
|
Agent
|
Concentration |
Duration
of Action |
Maximum
Safe Dose** |
| Topical anesthesia |
Lidocaine
|
2-4%
|
15 min.
|
100 mg
|
| (mucous membranes) |
Cocaine*
|
4-10%
|
30 min.
|
100-200 mg
|
|
Tetracaine*
|
0.5-2%
|
45 min.
|
40-60 mg
|
|
|
Benzocaine*
|
2-10%
|
30-45 min.
|
||
| Local Infiltration |
Procaine*
|
0.5-1%
|
15-30 min.
|
1000 mg
|
|
Lidocaine
|
0.5-2%
|
30-60 min.
|
500 mg
|
|
|
Mepivicaine
|
0.5-1%
|
30-60 min.
|
300 mg
|
|
|
Bupivicaine
|
0.25-0.5%
|
30-90 min.
|
300 mg
|
|
|
Tetracaine*
|
0.1-0.2%
|
30-60 min.
|
75-100 mg
|
|
| Major Nerve Block |
Lidocaine
|
1-2%
|
30 min.
|
500 mg
|
|
Mepivicaine
|
1-2%
|
60-120 min.
|
500 mg
|
|
|
Tetracaine*
|
0.1-0.25%
|
120-360 min.
|
75 mg
|
|
| Epidural anesthesia |
Procaine*
|
1%
|
30-60 min.
|
500 mg
|
|
Lidocaine
|
1-2%
|
45-90 min.
|
500 mg
|
|
|
Mepivicaine
|
1-2%
|
60-120 min.
|
500 mg
|
|
|
Tetracaine*
|
0.1-0.5%
|
120-360 min.
|
75-100 mg
|
|
| Spinal anesthesia (amides preferable) |
Procaine*
|
2%
|
30-60 min.
|
|
|
Lidocaine
|
5%
|
45-90 min.
|
||
|
Tetracaine*
|
0.5-1%
|
60-120 min.
|
||
| Intravenous regional anesthesia |
Lidocaine
|
0.25-0.5%
|
varies
|
100-150 mg
|
* signifies ester; the rest are amides. Only advantage for esters is that they may be preferable in patients with malignant hyperthermia.
** for an average size adult
Above adapted from the article by Cousins and Mather.[8]
L. Wound Closure
- Before proceeding with any wound closure, carefully inspect the wound for injuries to major blood vessels, nerves and tendons.
- Clean the wound well by irrigation; remove all foreign materials and debride necrotic or devitalized tissues; consider trimming beveled wound edges to vertical wound edges. Optimal pressure for irrigation is about 5 to 8 psi, typically achieved by using a 19 gauge needle or domed irrigation splash guard on a 35 mL syringe. Remember to use personal protective gear during irrigation!
- Prior to skin closure, be sure the skin edges coapt easily without tension. This may sometimes requires undermining subcutaneous tissues, as well as closing deep layers. In the presence of an extensive surface avulsion, the residual defect may need to be covered immediately with a split-thickness skin graft.
- For skin closure when there is a linear laceration without much tension, consider using subcuticular sutures; for everting wound edges, try a few vertical mattress sutures; for bringing together wound edges under tension, use some buried sutures and/or vertical or horizontal mattress sutures
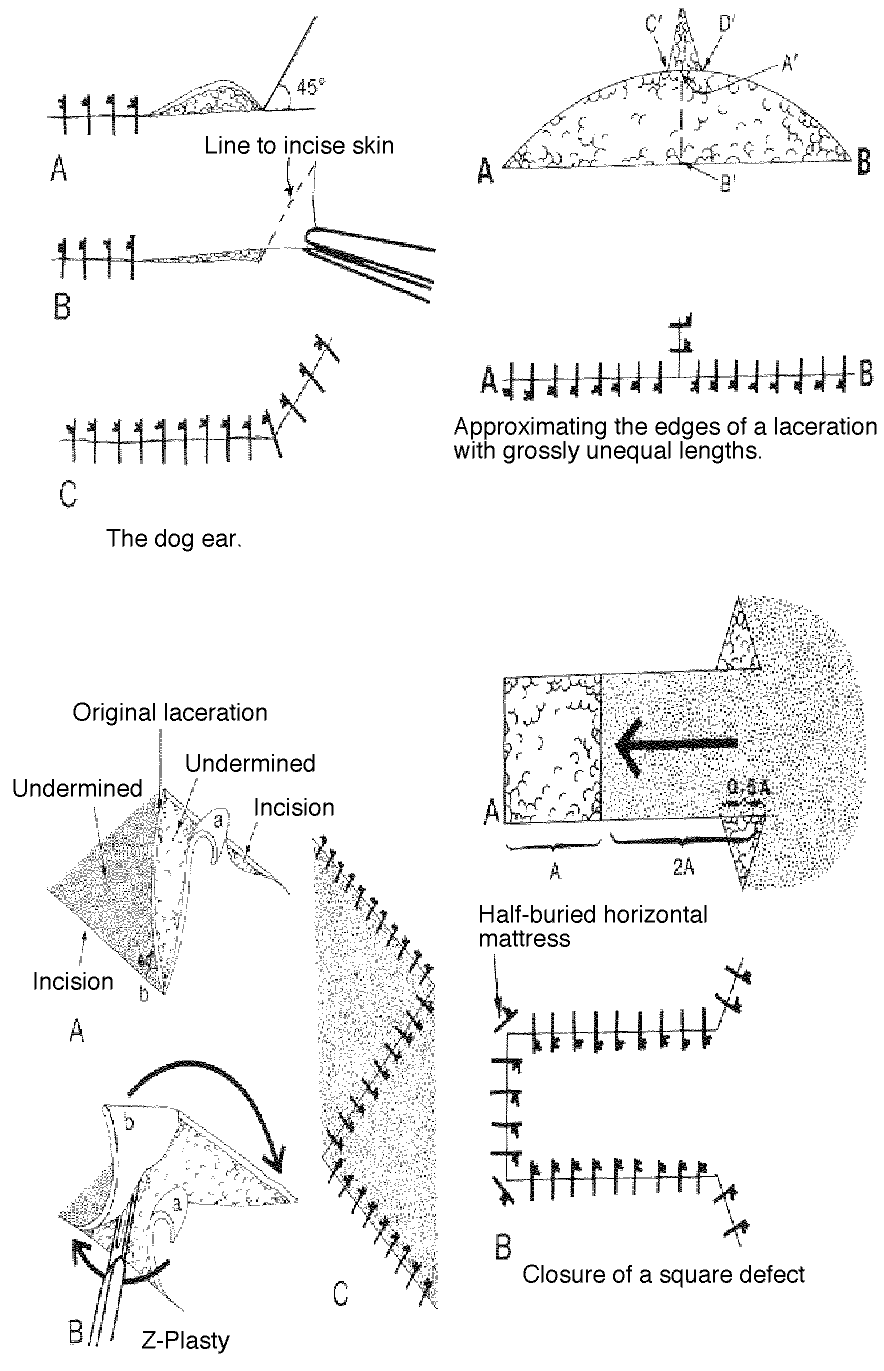
- It is usually most useful to start in the middle of wounds longer than 3 cm. in order to avoid dog-earing.
A few words on irrigation and sterility:
Moscati (also cited below), several RCTs and a Cochrane review all suggest that irrigation with tap water is as efficacious as irrigating with normal saline, with no increase in infection rates. Use of clean tap water instead of sterile saline might be an important consideration in wound requiring massive amounts of irrigation or in resource poor environments. Likewise, several studies suggest that the use of clean non-sterile examination gloves versus sterile surgical gloves has little to no impact on the rate of infections post repair.
| Simple interrupted sutures | Good for general tissue approximation, can be used for most wounds |
| Simple running sutures | Fast and effective for long lacerations All sutures are lost if one suture is cut by mistake or removed for drainage |
| Horizontal mattress sutures | Effective for everting wound edges Can cause skin necrosis and excessive scars |
| Vertical mattress sutures | Most effective for everting wound edges Can cause skin necrosis and excessive scars |
| Half-buried mattress (corner) sutures | Most effective in everting triangular wound edges in flap repair |
| Running subcuticular sutures | Fast and effective in accurate skin edge apposition Does not allow for drainage Suited for closing clean wounds, such as surgical wounds in the operating room |
| Interrupted dermal sutures | Effective in accurate skin edge apposition and wound eversion Allows for minimal drainage Suited for closing clean wounds |
| Staples | Fast, creates loose closure Allows for drainage Suited for unclean wounds Should be avoided if cosmetic outcome is important |
| Wound adhesive strips | Fast, no anesthesia required, used to approximate clean, simple, small lacerations with little tension and without bleeding |
| Tissue Adhesive | Fast, no anesthesia required, used to approximate clean, simple, small lacerations with little tension and without bleeding |
M. Wound Care
- Particularly in areas of tension or in wounds closed with subcuticular sutures, consider using surgical tapes as well as sutures for added security.
- Encourage rest and elevation of the affected part.
- Consider use of a splint when the laceration extends across a mobile part.
- Sterile moist wounds will reepithelialize more quickly than desiccated wounds; keep wounds clean with a dressing and prevent drying by use of colloidion/occlusive/semi-occlusive dressings or use of a sterile antibacterial ointment for at least 1-2 days.
- Uncomplicated wounds may usually be washed (or otherwise wet) after 24 to 48 hours from the time of repair.
- Encourage the patient to gently remove crusted blood or accumulated secretions from the wound (H2O2 diluted 1:1 with water may be useful in this regard)
N. The Role of Prophylactic Antibiotics
There are clinical studies that unequivocally demonstrate that the incidence of wound infections is decreased in the setting of appendectomy, abdominal trauma surgery, or posttraumatic thoracostomy/thoracotomy when antibiotics are given within two hours of the start of surgery. Whether this applies to superficial wounds is unknown. As with antibiotic irrigation, it would appear to make sense that benefit should result from this practice. Unfortunately, however, the data are lacking (partly due to the fact that most high-risk patients have been excluded from most blinded clinical studies – they were simply treated).
Because prophylactic antibiotics seem to be used liberally by plastic surgeons, it may be implied that these physicians, who should be experts at wound care, know something about wounds that the rest of the medical community does not — that prophylactic antibiotics decrease the incidence of wound infections in community-acquired simple wounds. Perhaps, to be fair, a distinction should be made between the one-time use of parenteral antibiotics and the ongoing prescription of oral antibiotics.
Although there don’t appear to be any recent applicable data that relate to the one-time parenteral use of antibiotics, there are good data that assess the value of ongoing oral prophylactic antibiotics. Five studies of community-acquired lacerations published between 1977 and 1983, involving approximately 1,600 patients (including 1,100 hand lacerations) all concluded that prophylactic antibiotics did not significantly alter the rate of wound infections. A meta-analysis of seven randomized, controlled studies of non-bite lacerations involving 1,701 patients found that the odds ratio for an infection was actually increased in patients treated with prophylactic antibiotics, although the 95% confidence interval ranged from 0.77 to 1.78. Plastic surgeons might be interested to note that in the subset of studies in which parenteral antibiotics were given, no benefit was found.
Even in the setting of dog-bite lacerations the data clearly indicate that the majority of patients will get no benefit from prophylactic antibiotics. In a recent meta-analysis of eight randomized, controlled trials involving 783 patients it was concluded that prophylactic antibiotics were of some value. Specifically, if they were given to 100 patients, seven infections would have been prevented (a reduction in the infection rate of 40-50%). However, the author notes that, since 93 of 100 patients would receive no benefit and, because most infections can be easily treated once diagnosed, it would be prudent to limit the use of prophylactic antibiotics to high-risk wounds (another study identified high-risk dog-bite wounds to be those that were full-thickness, required debridement, and those occurring in females).
Hopefully the point is made that, even in dog bites, the vast majority of patients will receive no benefit from prophylactic antibiotics, and that, if wounds become infected, they are usually easily treated at the time of diagnosis.
Once the decision is made to use prophylactic antibiotics, they need to be administered quickly; if there is more than a 3-4 hour delay in the administration of antibiotics, bacterial growth rates are no different than in the untreated patient and no clinical study has shown benefit.
If there is an IV in place, the antibiotic should be given by this route. The ideal duration of therapy is not clear from clinical studies, but probably should be no longer than 72 hours (note that this is for prophylaxis, not for established wound infections).
All this being said, there are certain situations in which most people would use prophylactic antibiotics!
|
Type of Injury
|
Treatment
|
| Lacerations involving a tendon, joint, or nerve (especially distal extremities) | generally a 1st generation cephalosporin such as cefazolin (IV) or cefalexin (PO) |
| Wounds contaminated by saliva, feces, or vaginal secretions subject to primary closure |
saliva- penicillin; stool or vaginal secretions – amoxicillin and metronidazole or ciprofloxacin and metronidazole |
| Through-and-through intraoral lacerations | penicillin |
| Possible treatment – wounds grossly contaminated with soil | penicillin or 1st generation cephalosporin |
| Full thickness cat bites, human bites and high risk* dog bites | augmentin, penicillin and 1st generation cephalosporin, or cefuroxime |
| Grossly contaminated (soil or secretions as above) wounds or ones where standard repair may produce bacteremia in patients with prosthetic joints, valves, significant valvular disease | AHA prophylaxis regimens for patients with valve disease/prostheses as follows: for soil contaminated wounds, penicillin or 1st generation cephalosporin; for saliva contaminated wounds, penicillin; for stool or vaginal secretion contamination, IV ampicillin and gentamicin or PO amoxicillin and metronidazole or ciprofloxacin and metronidazole |
*High risk dog bites might include: deep puncture wounds which can’t be cleaned well; crush wounds; lacerations to the hand, foot, wrist, or over a major joint (scalp or face in infants); treatment delay over 6-12 hours; age <2 or >50; asplenia; immunocompromise; chronic steroid use; prosthetic or diseased joint or cardiac valve.
O. Special Techniques, Tips, and Assorted Trivia
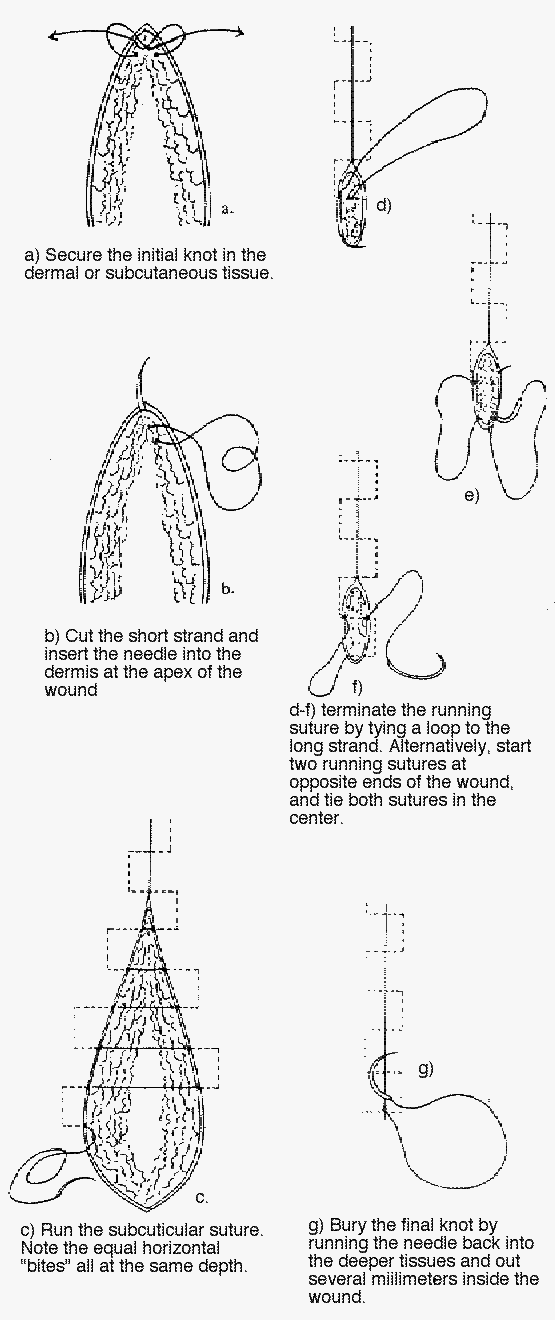
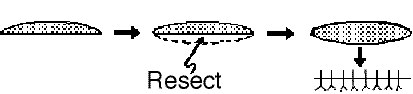
1) Subcuticular sutures:
Start the closure with synthetic absorbable subcuticular sutures by inserting the needle intradermally at one end of the wound and then tying a knot, as shown below. If nonabsorbable sutures are used, insert the needle through the skin from beyond the edge of one end of the wound and through the dermis. No matter which material is used, take subsequent small, horizontal intradermal “bites” of equal proportion parallel to the wound, but on alternate sides at the same level. Do not lock any of the sutures, since doing this makes it impossible to pull the wound closed. Upon reaching the opposite end of the wound with absorbable sutures, tie a subcutaneous knot after pulling each end taut. When using nonabsorbable sutures, insert the needle intradermally and exit at a margin from the edge of the wound.
Burying the final knot when using absorbable sutures can be difficult. An easy way of handling this problem is to run the needle back into the deeper tissues and out several millimeters inside the wound. Pulling the suture material taut causes the knot to disappear into the subcutaneous tissue.
For the absorbable suture technique, use a size 4-0 or 5-0 polyglycolic acid or polyglactin suture. For the nonabsorbable technique, a size 4-0 or 5-0 nylon suture works well. Many physicians prefer absorbable sutures, especially in children and anxious adults, simply because there is no need for suture removal.
2) How long do sutures stay in?
• Generally speaking, you must balance the risks of foreign body reaction, infection, and stitch scarring against the skin tension forces likely to cause a scar to widen or a wound to reopen. In general, stitches will come out sooner in areas of cosmetic importance and/or under little tension and later in areas of little cosmetic import, under tension, or with very thick skin:
|
Location
|
Time to Removal
|
| Face | usually 4-5 days |
| Palms/soles | usually 10-14 days |
| Scalp | usually 7-10 days |
| Digits | usually 10-12 days |
| Extremities not under tension | usually 8-10 days |
| Extremities under tension (ext. surf. of knee, etc.) | usually 10-14 days |
| Anterior torso | usually 8-10 days |
| Back | usually 12-14 days |
• Use surgical tapes on wounds where sutures are removed early, especially in children! Despite the mild increase in inflammation, rapidly resorbing gut suture (usually 5-0) may be useful for pediatric facial lacerations; it tends to fall out so early that the inflammatory process is seldom an issue and sutures do not usually need removal. It’s not useful in areas requiring good tensile strength of the suture material.
Tetanus and tetanus wound prophylaxis:
The occurrence of tetanus in the United States has decreased dramatically over the last half century. The decline has resulted from widespread use of tetanus toxoid and improved wound management, including use of tetanus prophylaxis in emergency departments.
Tetanus in the United States in recent years is primarily a disease of older adults. The majority of cases reported to the CDC in recent years are from patients older than 50. From 2009–2017, more than 60% of the 264 reported cases were among people 20 through 64 years of age. In addition, a quarter of those reported cases were among people 65 years old or older. The risk of death from tetanus is highest among people 65 years old or older. Some 49%-66% of those greater than or equal to 60 years of age may lack protective levels of circulating tetanus antitoxin.[10] The case-fatality rate remains high – hovering around 20%.
Surveys of emergency departments suggest that 1%-6% of all persons who receive medical care for injuries that can lead to tetanus receive less than the recommended prophylaxis.[11] In 1987-1988, 58% of tetanus patients with acute injuries did not seek medical care for their injuries; of those who did, 81% did not receive prophylaxis as recommended by ACIP guidelines.[10]
In 4% of tetanus cases reported during 1987 and 1988, no wound or other condition was implicated. Nonacute skin lesions such as ulcers, or medical conditions such as abscesses were reported in association with 14% of cases.* Remember this when draining an abscess!
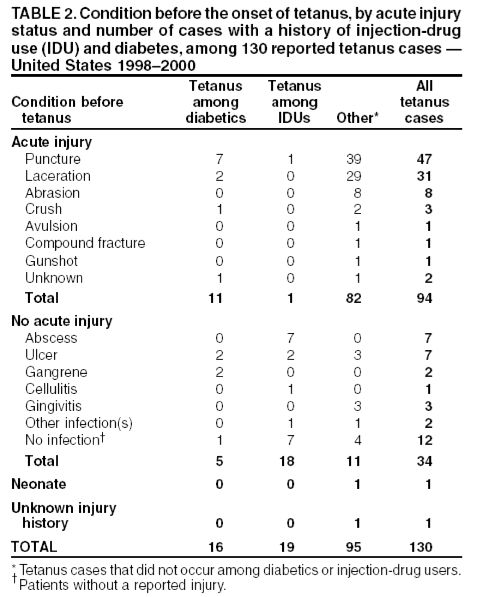
Above figure from:[10]
From the Immunization Practices Advisory Committee (ACIP): “Serologic tests indicate that naturally acquired immunity to tetanus toxin does not occur iin the United States. Thus, universal primary vaccination, with subsequent maintenance of adequate antitoxin levels by means of appropriately timed boosters, is necessary to protect persons among all age-groups. Tetanus toxoid is a highly effective antigen; a completed primary series generally induces protective levels of serum antitoxin that persist for greater than or equal to 10 years.”[10][12][13][14]
Along with wound cleaning and, if necessary, debridement and/or repair, the administration of tetanus toxoid, with or without immunoglobulin, is indicated if the patient did not complete an initial tetanus vaccination series or has not had a tetanus booster in the last 5 to 10 years (see below).
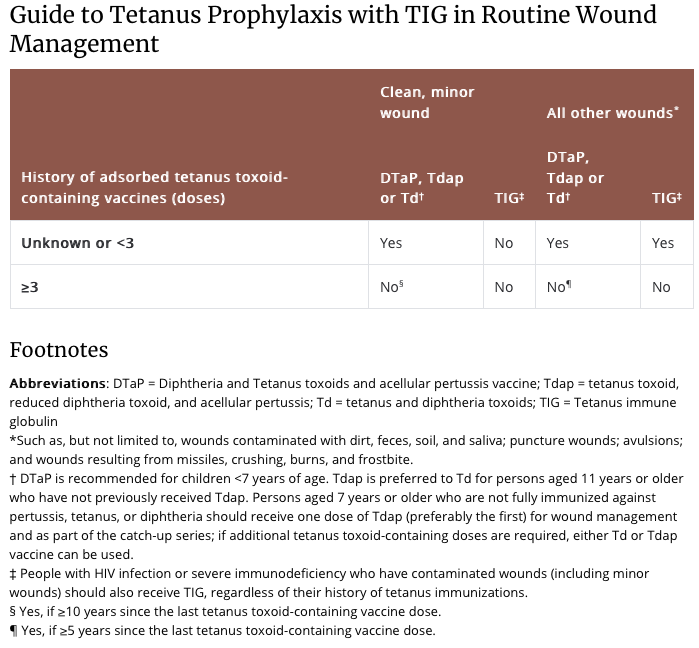
Above from: https://www.cdc.gov/tetanus/clinicians
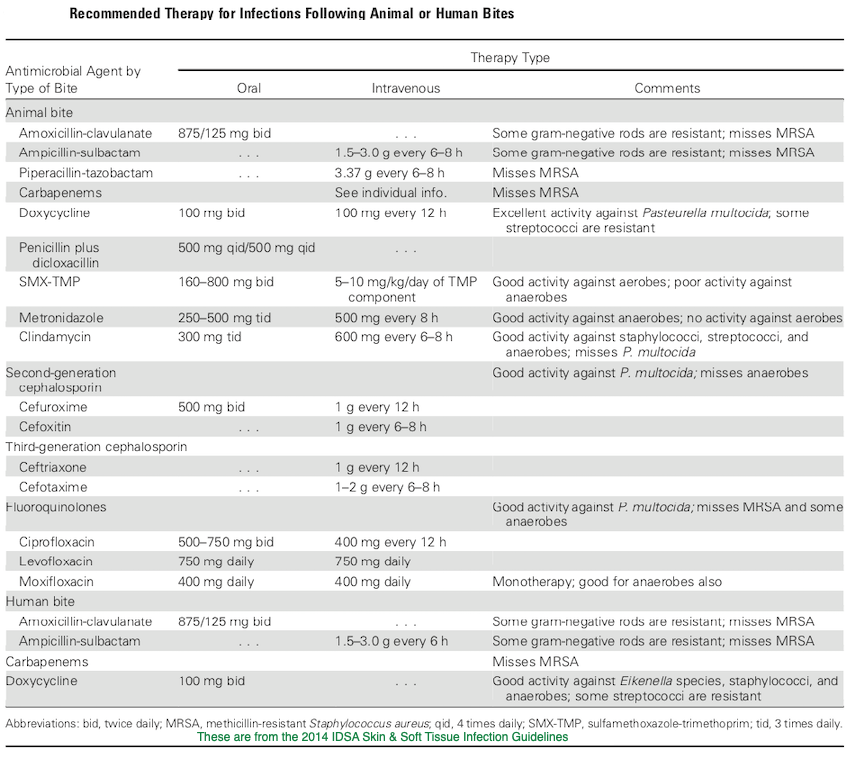
Animal Bite Infection Treatment Guidelines:
A few words about rabies:
And of course, with any mammalian wild animal bite (especially if the bite was unprovoked or the animal was behaving abnormally), consideration should be given to the need for rabies post exposure prophylaxis. Prompt wound care, including flushing and washing the wound with soap and water for at least 15 minutes and use of a detergent (an anionic detergent like sodium deoxycholate (DOC), β-propiolactone, even hand sanitizer or vinegar or lemon juice in a pinch) is the appropriate first step. If it is determined that rabies PEP is indicated (your local public health department may be helpful in this regard), the CDC has since 2010 been suggesting the administration of rabies immune globulin RIG) and a 4 dose human diploid cell or purified chick embryo cell vaccine series. Both the 1st dose of vaccine and RIG should be administered as soon as possible; the date of the first vaccine dose is considered day 0 of the necessary series, and subsequent doses should be given on days 3, 7, and 14. If RIG was initially unavailable, it can be given up to day 7 of the vaccine series. As much of the weight based RIG dose as possible should be infiltrated locally around the wound/s and the remainder at a site distant from the initial dose of vaccine. The initial vaccine dose should not be in the same extremity as the RIG. If the animal has been captured and has tested negative for rabies, PEP can be discontinued. PEP is universally effective in preventing rabies if given promptly and appropriately![33]
 |
 |
|
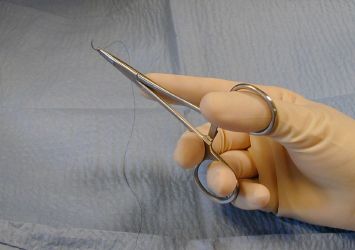
The classic thumb-ring finger needle holder grip
|
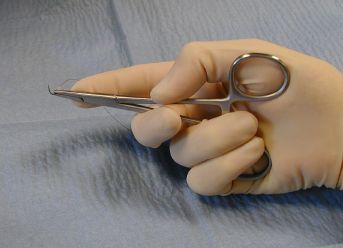
The thenar needle holder grip.
|
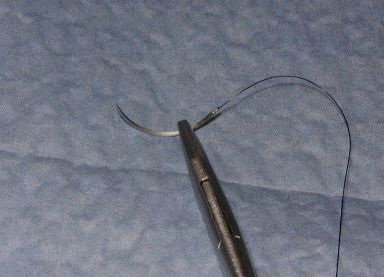 |
| Arm the needle holder by grasping the needle with the tip of the needle holder about 1/3 of the way down from the swedge; the needle tip should point at about a 90-degree angle from the needle holder. |
 |
 |
|
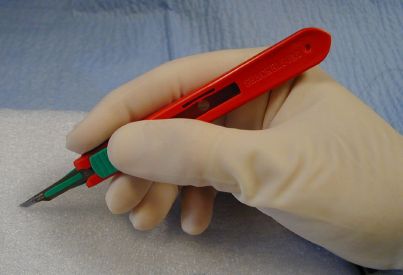
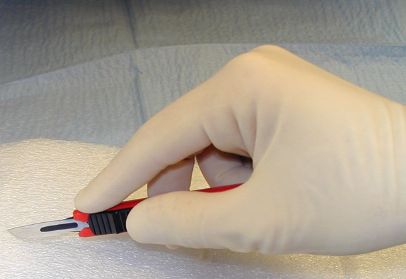
Hold a #15 blade like a pencil.
|
Hold a #10 blade like a glass cutter.
|
 |
 |
|
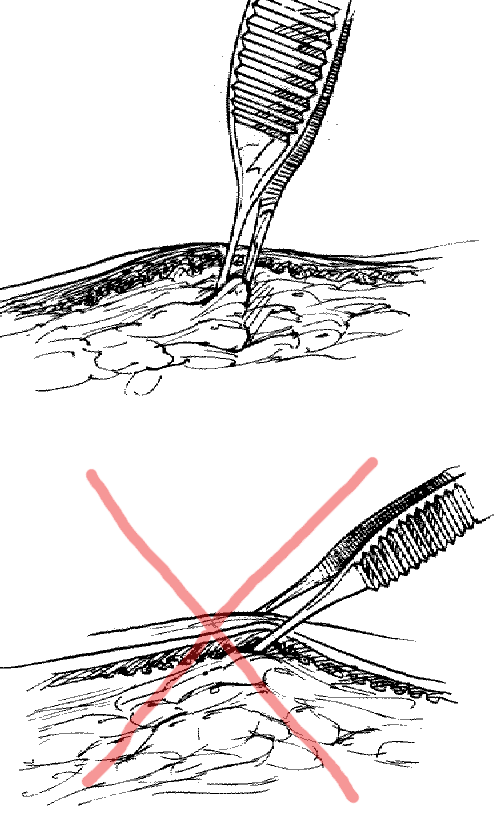
Dealing with a beveled laceration: Use a deeper and larger bite on the side opposite the flap of a beveled laceration.
|
Using forceps: Grasp the subcutaneous tissue, not the skin itself.
|
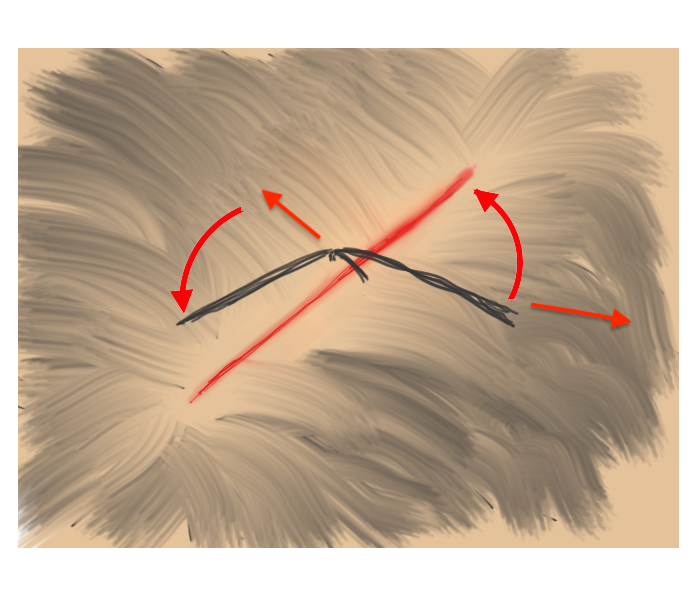
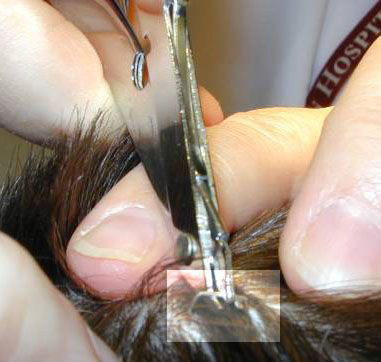
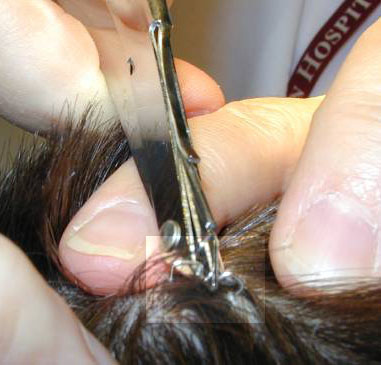
Hair Apposition Technique for scalp lacerations:
A very useful closure technique for reasonably short (10 cm or less), uncomplicated scalp lacerations with adjacent hair at least 3 cm in length and where active bleeding has been controlled. From the HAT study, reference #31 below.
 |
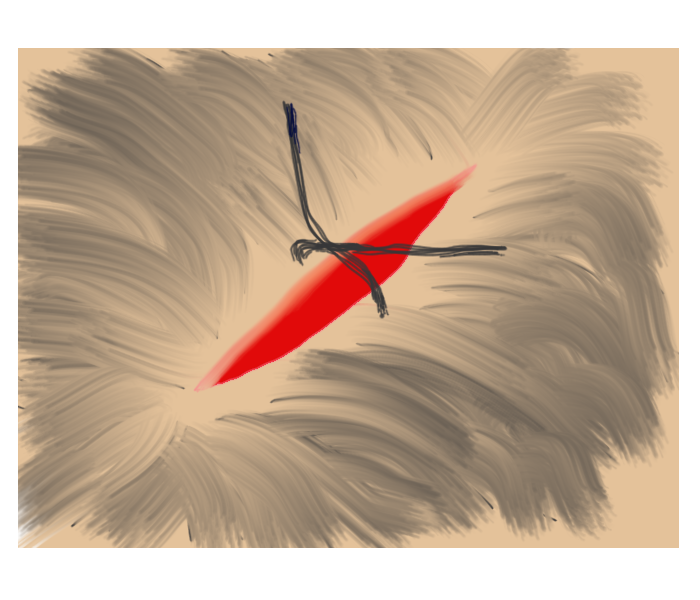 |
| 1. Inspect, clean, and irrigate the wound as usual. | 2. Choose 4-5 strands of hair on opposing sides of the laceration and gather into a bundle. |
 |
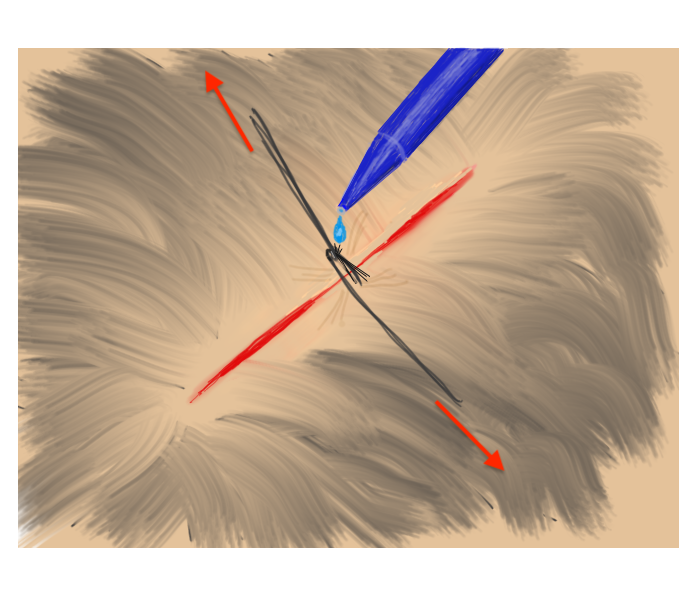 |
| 3. Pull traction on the the grouped hair strands sufficient to bring the skin edges together, then rotate/twist one band about the base of the other. | 4. While maintaining traction sufficient to approximate the wound edges, apply a drop of tissue adhesive to the twist. Repeat as needed until wound is closed. |
Some methods for dealing with dog eared and flap lacerations:

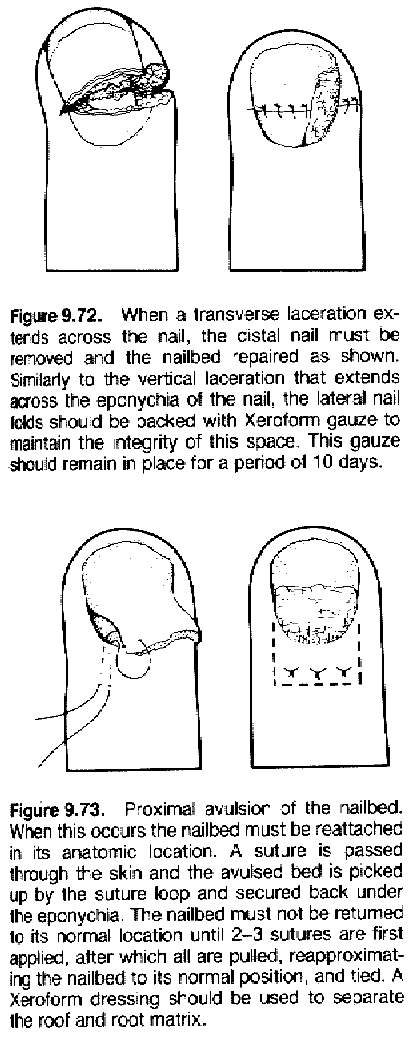
Some nail injury techniques:
 |
 |
| 1. The suture is grasped. | 2. The knot is elevated. |
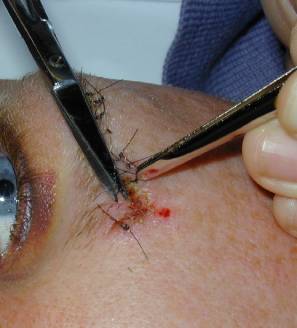 |
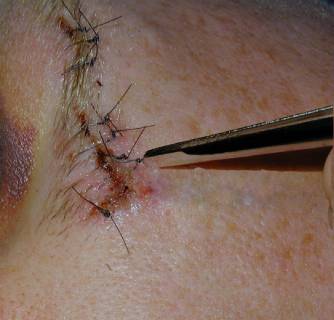 |
| 3, Suture scissors are slipped under the suture with the blades just on top of and parallel to the skin. | 4. The suture is pulled free, dragging only a minimum of contaminated suture through the suture tract. |
 |
 |
|
Step 1. Place the staple remover with its center arm positioned on the TOP of the midportion of the exposed staple, with the 2 lateral arms BENEATH.
|
Step 2. Squeezing the handles of the remover will bend the staple, lifting the embedded prongs of the staple out of the skin while depressing the middle. N.B., if you reverse the staple remover, you will end up bending the staple arms down and in even more deeply! |
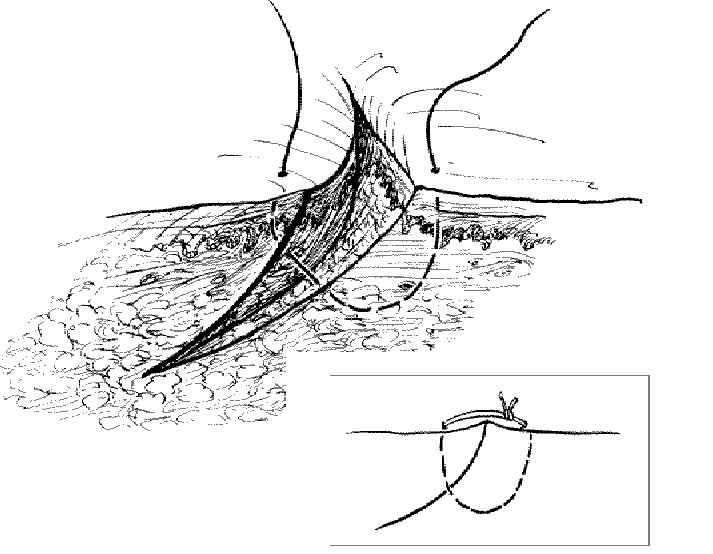
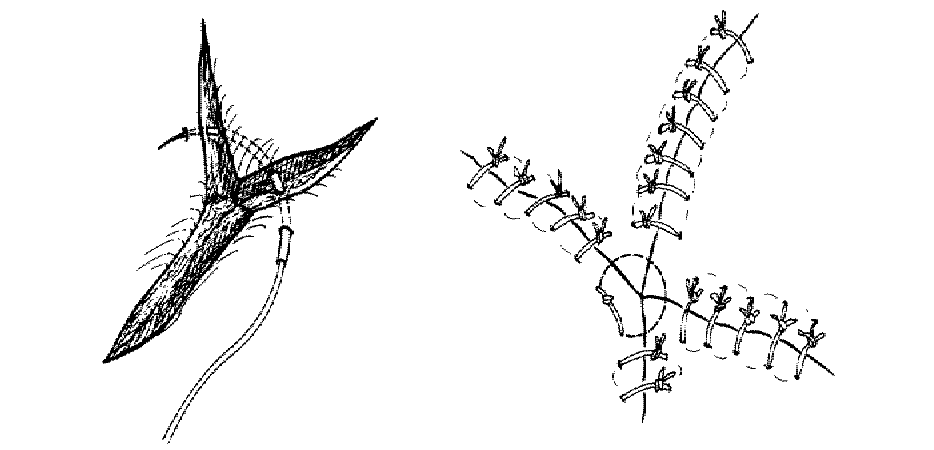
The corner suture
Suture closure of a V-shaped laceration is a frequent problem. A stitch placed across the tip of this flap can occlude residual blood supply to the tip, resulting in ischemia. To advance the flap while preserving blood supply, use a corner stitch. Approximate the flap, then secure it in position with the necessary interrupted sutures back from the tip. Now insert the corner stitch through the skin above and lateral to the angle of the wound. Pass the stitch horizontally beneath the skin of the flap. Maintain a constant depth. Insert through the dermis of the opposing side and secure.
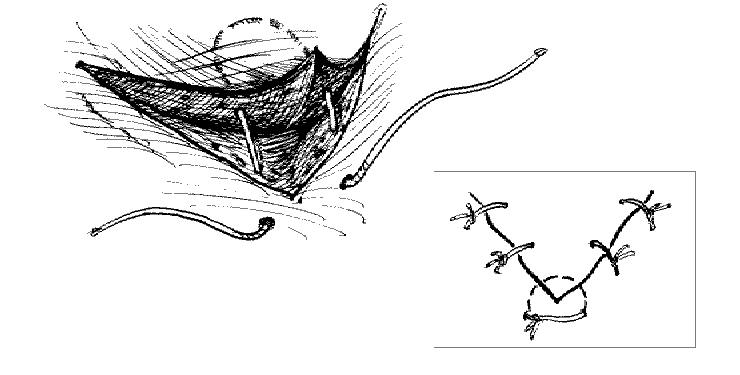
Use of the corner suture in closing the center of a stellate laceration:
Subcuticular Technique:
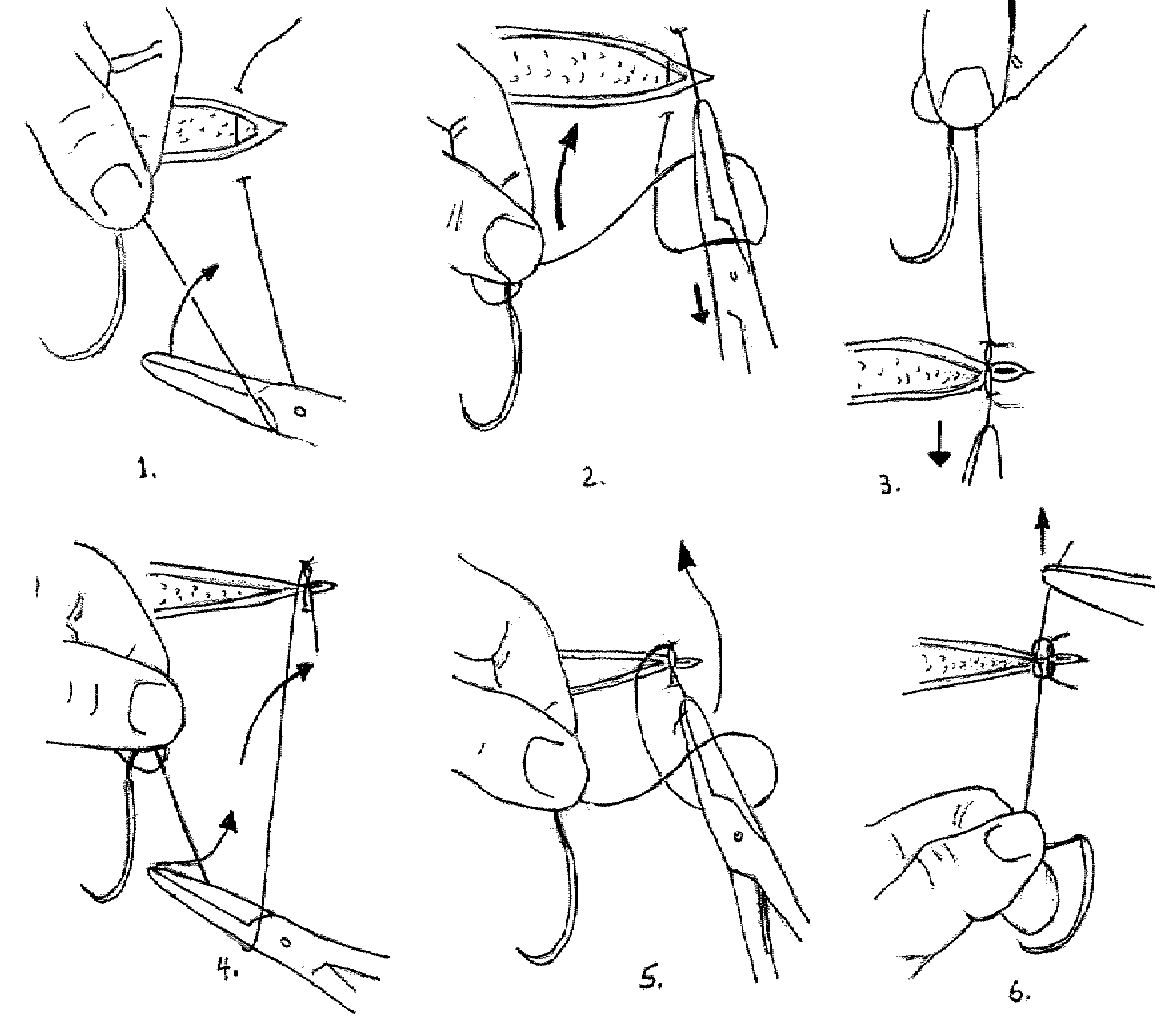
The Instrument Tie:
1. The short end can be pulled quite short. Make a loop of the long end of the suture about the needle holder beginning with the instrument in front of the suture.
2. Grasp the short end of the suture by the needle holder which is through the loop.
3. Pull the suture through the loop and set the knot down properly using only the instrument for traction. The traction must be exerted in the plane of the knot. Pull the short end toward you and the long end away.
4. Start the second half hitch by again wrapping the long end about the needle holder, but in this instance do it in the opposite direction. Begin with the instrument behind the long end of the suture.
5. After making the loop about the needle holder, grasp the short end of the suture with the instrument and pull it through the loop.
The Instrument Tie, Illustrated:
Another method of dealing with wounds with edges of unequal length (dog-earing):
Running suture:
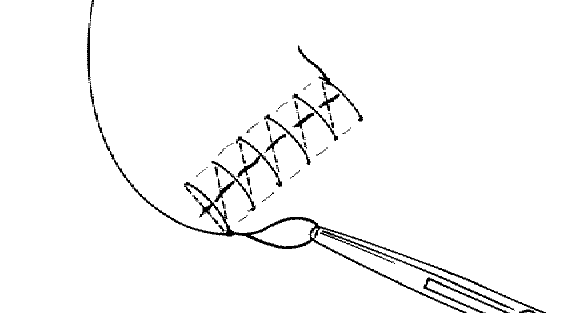
The technique for a continuous over-and-over (running) suture; note that the needle bites are made at an angle of 45 degrees to the long axis of the wound, keeping the cross stays of the sutures at the skin’s surface at a 90 degree angle to the wound’s axis.
| Continuous (running) Suture Technique: |
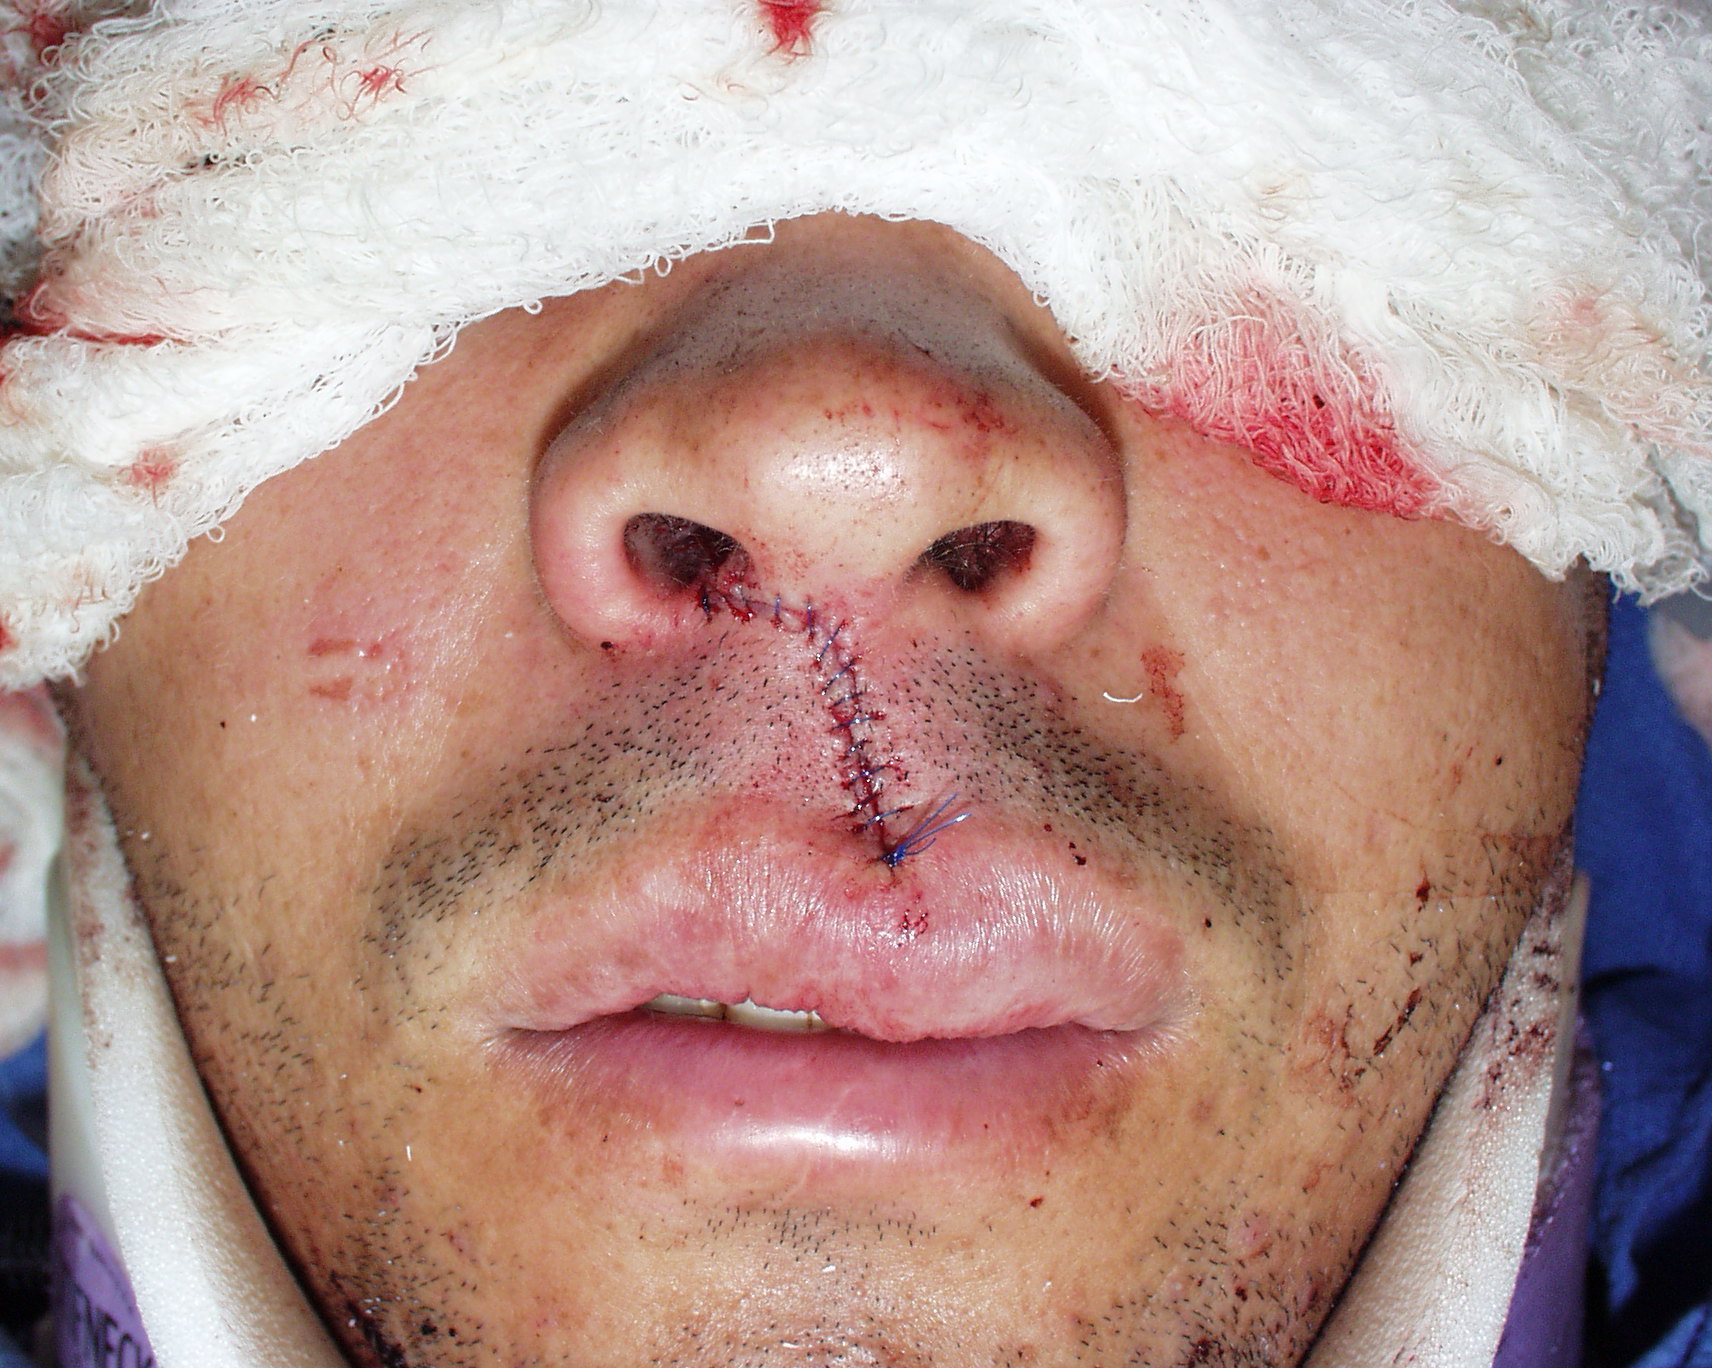
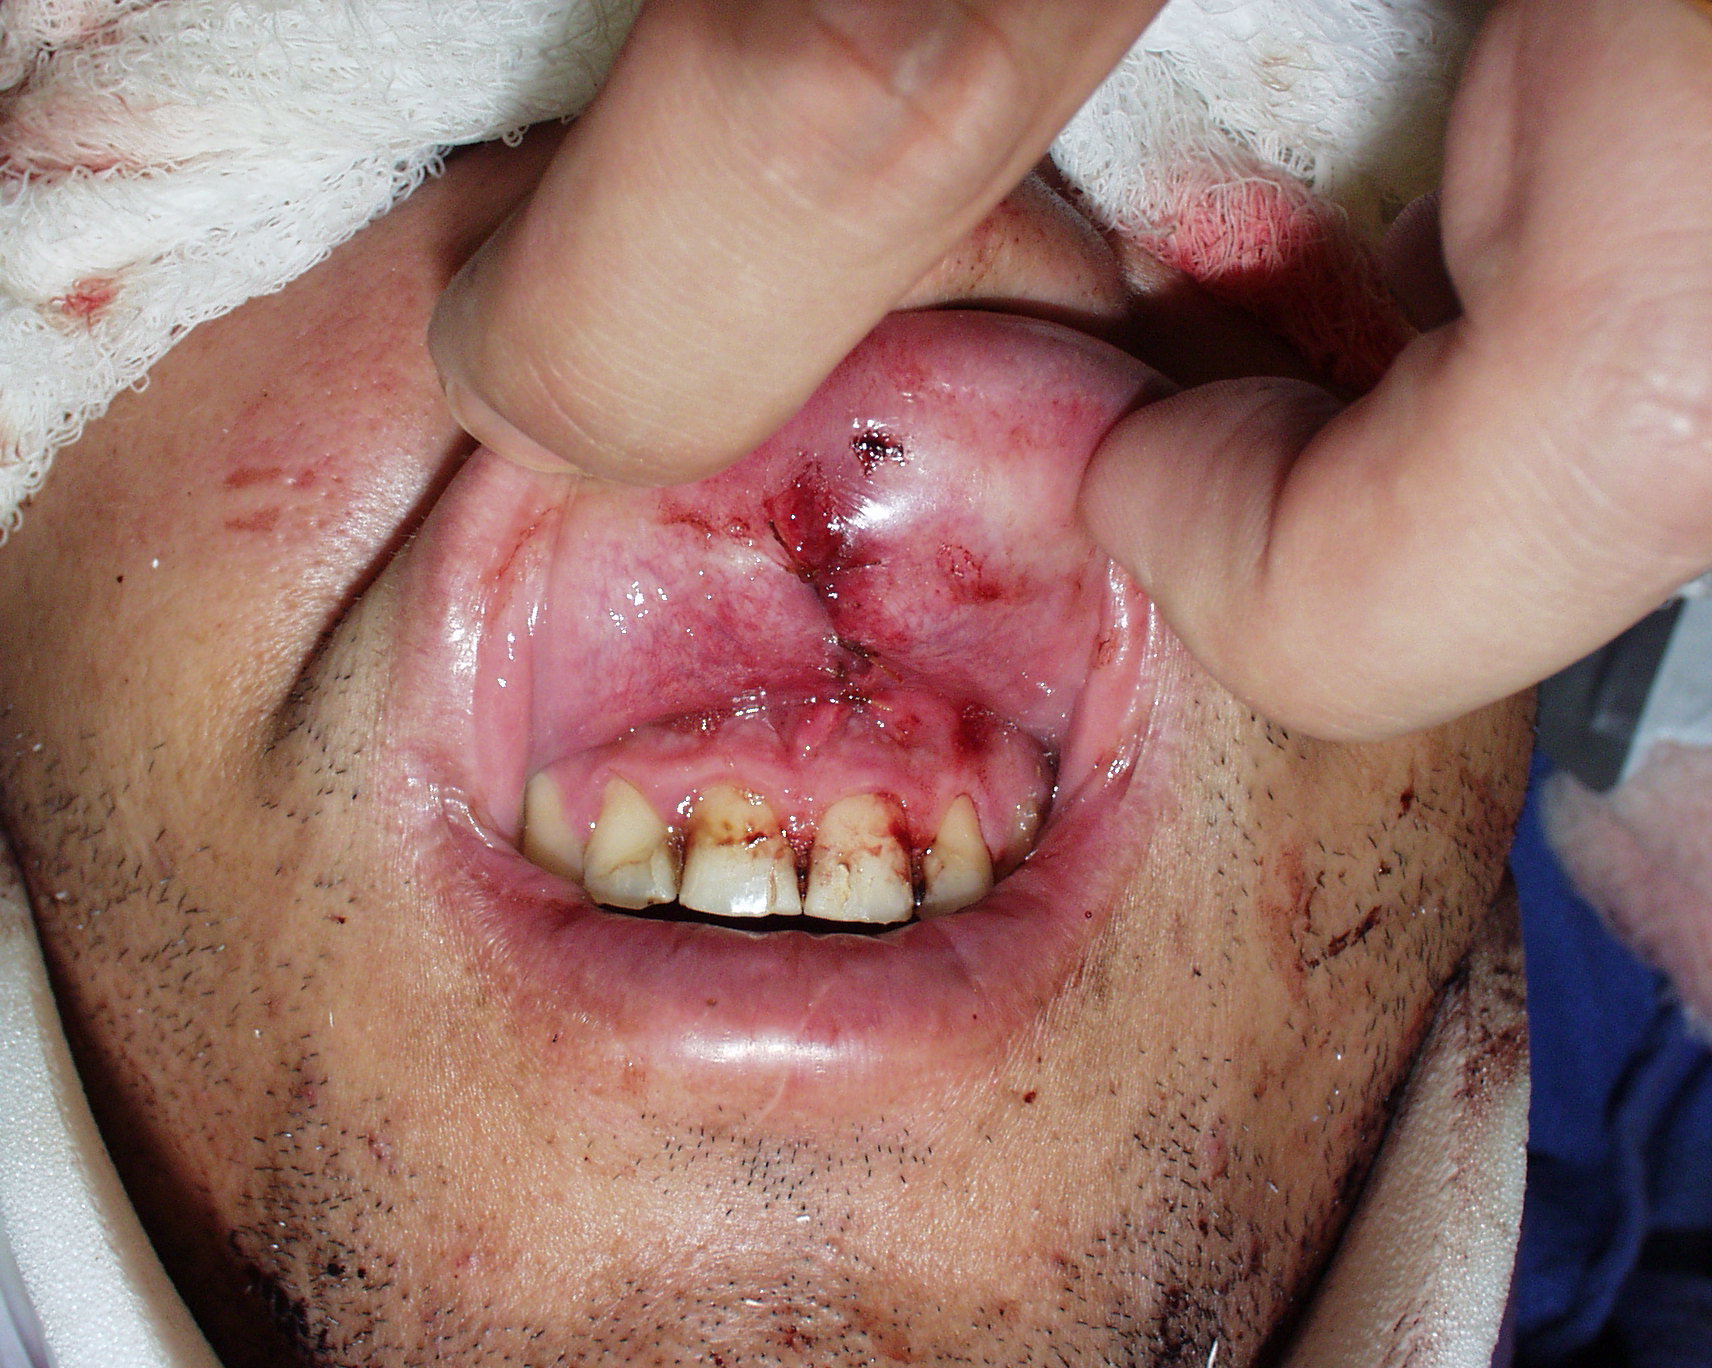
Lip Lacerations:
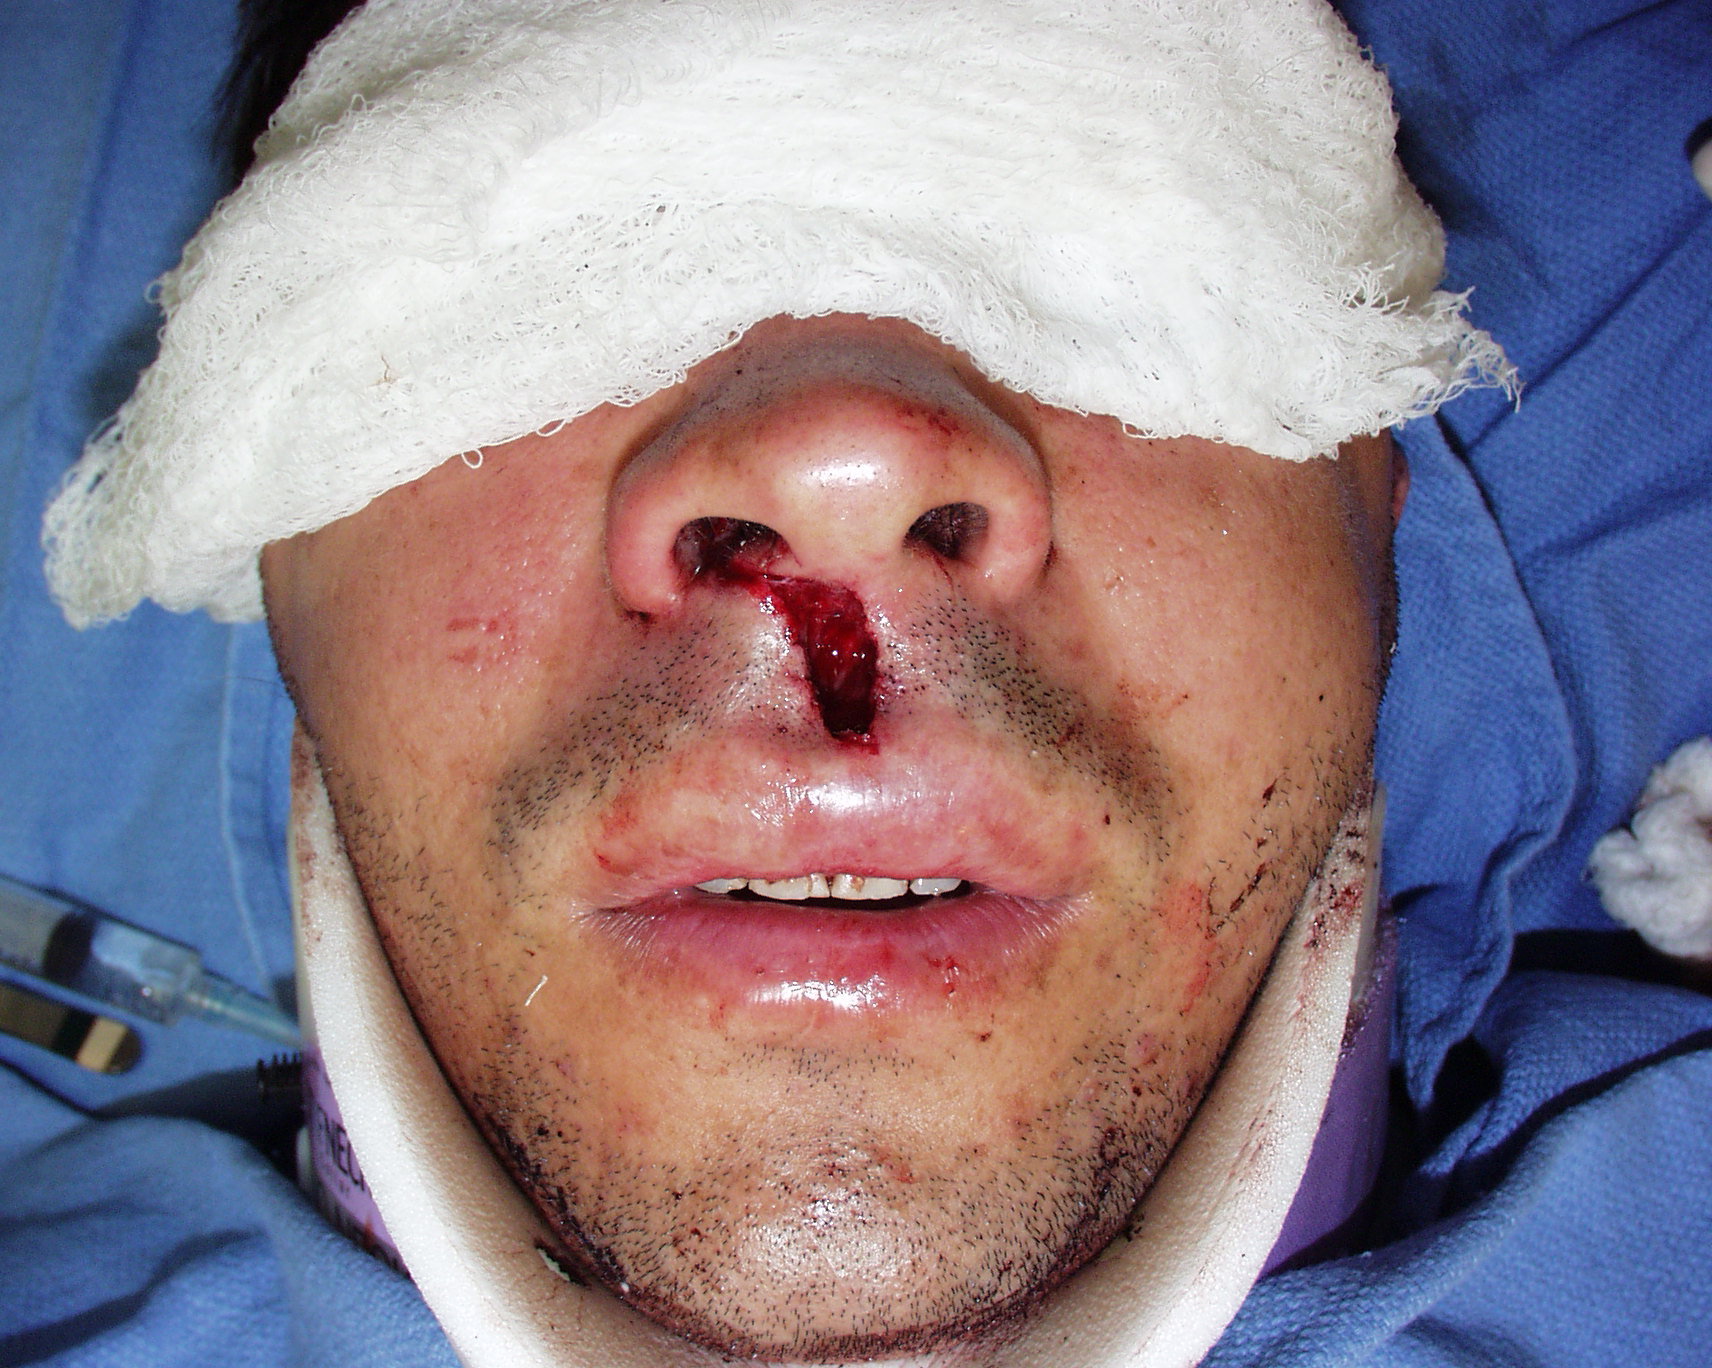 |
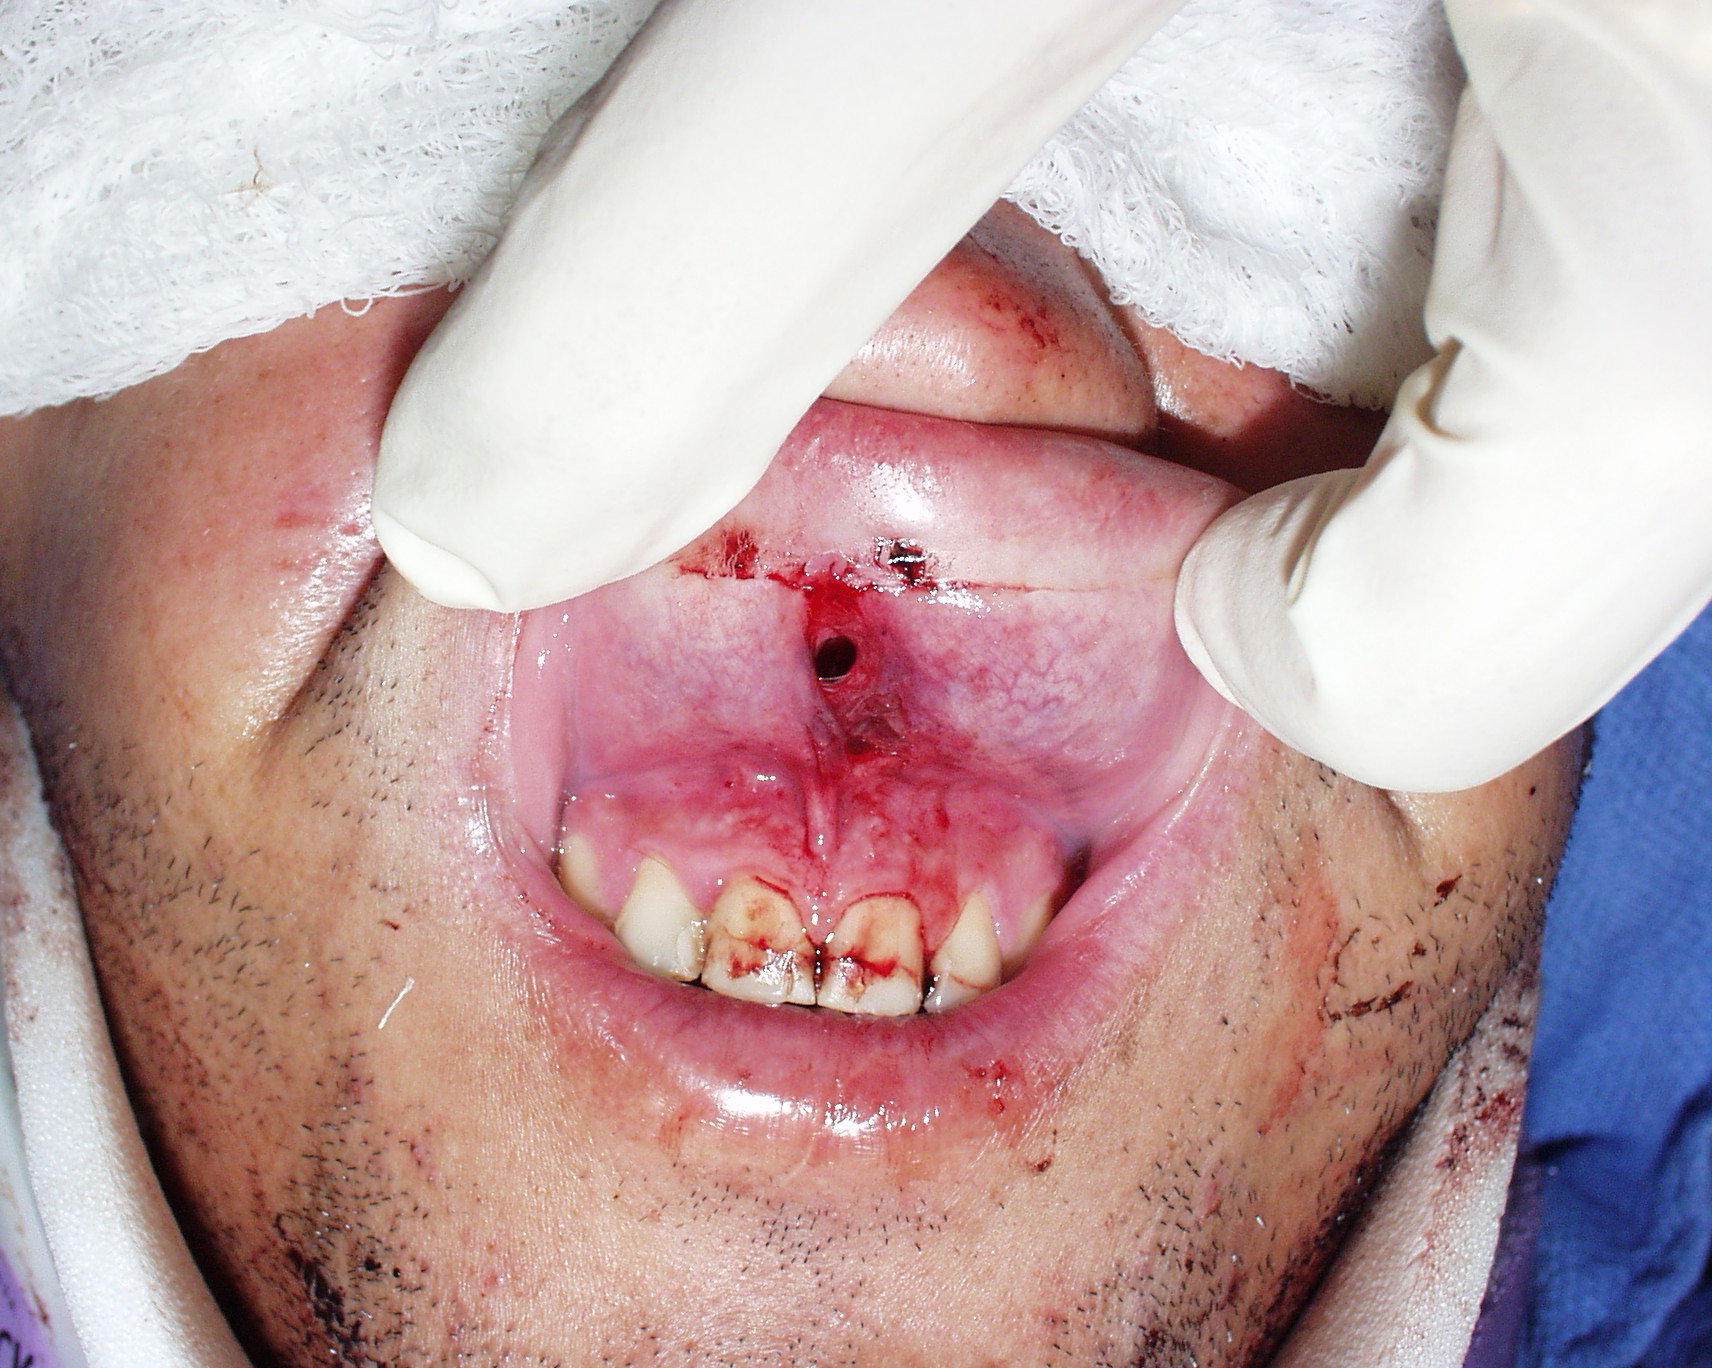 |
| 1. Upper lip laceration from nares through philtrum to just above the vermillion border. | 2. Inspection shows the wound is full thickness, through-and-through. |
 |
 |
| 3, The external/dermal portion of the laceration closed with a running 6-0 Prolene suture. | 4. The mucosal surface is loosely closed; an absorbable suture can be used here. |
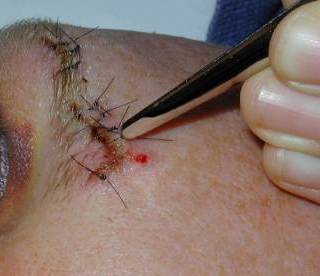
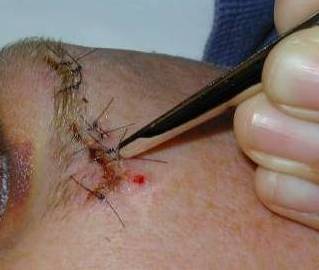
Of course, in order to preserve cosmesis, it is often useful to place initial sutures at obvious anatomical landmarks that happen to be along the course of the wound, such as tattoos, old scars, pigmented macules, eyebrows, etc. In the case of lacerations extending across the vermillion border of the lip, the initial suture should be placed at the vermillion border:
 |
Fig 1: Be careful when assessing the seemingly simple “finger caught in the door.” This was an image at of the left middle fingertip at the time of presentation. X-rays of that finger ordered at the time of triage were normal. |
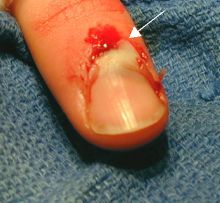 |
Fig 2: After a digital block, cleaning, and debridement of the avulsed portion of the proximal nail fold. Note that the ulnar root of the nail has been avulsed from its normal position abutting the germinal matrix under the nail fold (top right of the picture, white arrow) and is lying on top of the nail fold. |
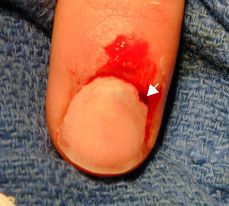 |
Fig 3: The nail was cleaned and replaced in the sulcus under the nail fold. The small dark area at upper left of the nail (white arrow) in the image is a hole in the nail made using a small electric cautery. This was done in order to decompress any potential subungual hematoma accumulation now that the nail has been replaced. |
In any case of extremity trauma, remember to look for a ring or constricting band distal to the injury. If there is any possibility of swelling, it is important to remove the ring or band as soon as possible, before circulation and neurovascular function are compromised. If the ring cannot be removed manually, you can of course use a ring cutter to cut it off. In cases where the patient would like to preserve the jewelry, it may be possible to use the following technique. This should not be used in cases where there is an unstable local fracture or where you may cause further significant trauma. It may also be quite painful, and there should be a discussion of this fact with the patient. Consider using a digital block if it is deemed safe to do so.
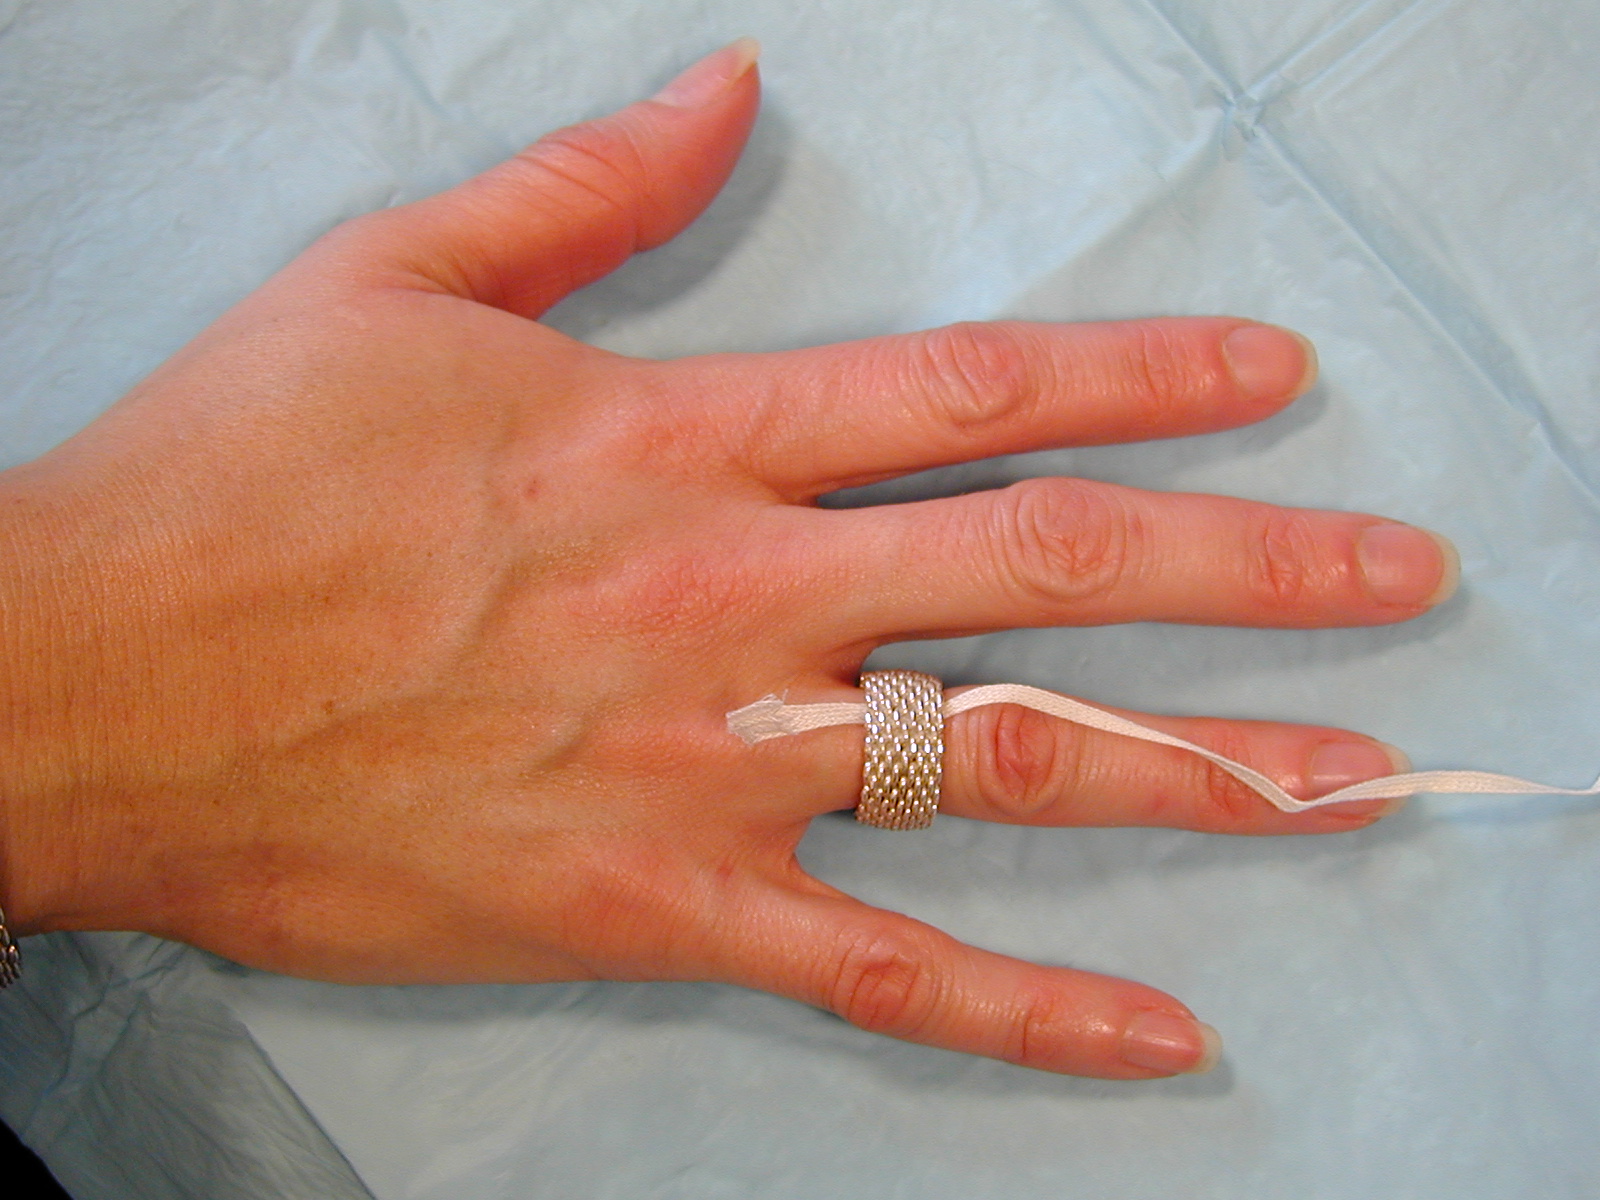 |
Step 1: Slide one end of a heavy piece of suture material or, preferably, umbilical tape, under the ring. Pull through just enough to maintain a good grip. |
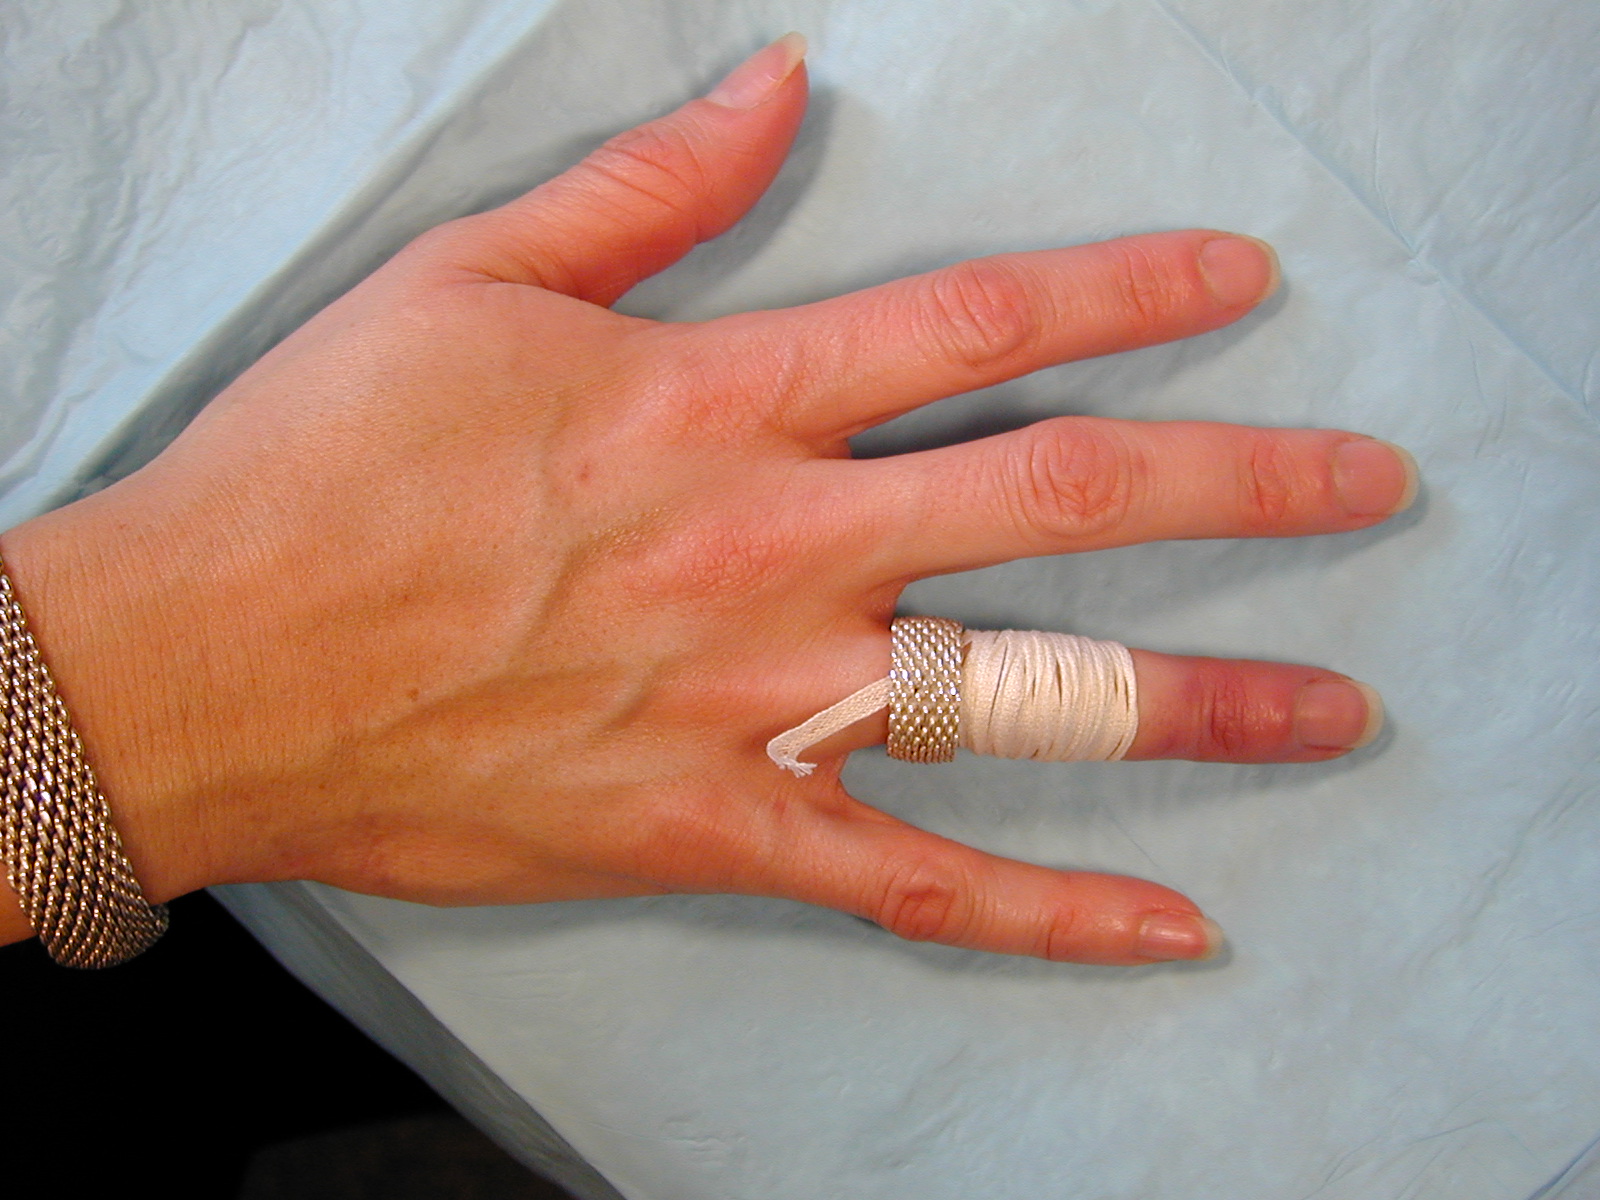 |
Step 2: Wind the distal end of the tape tightly around the finger, starting just beyond the ring and as far as the length of the tape will allow. |
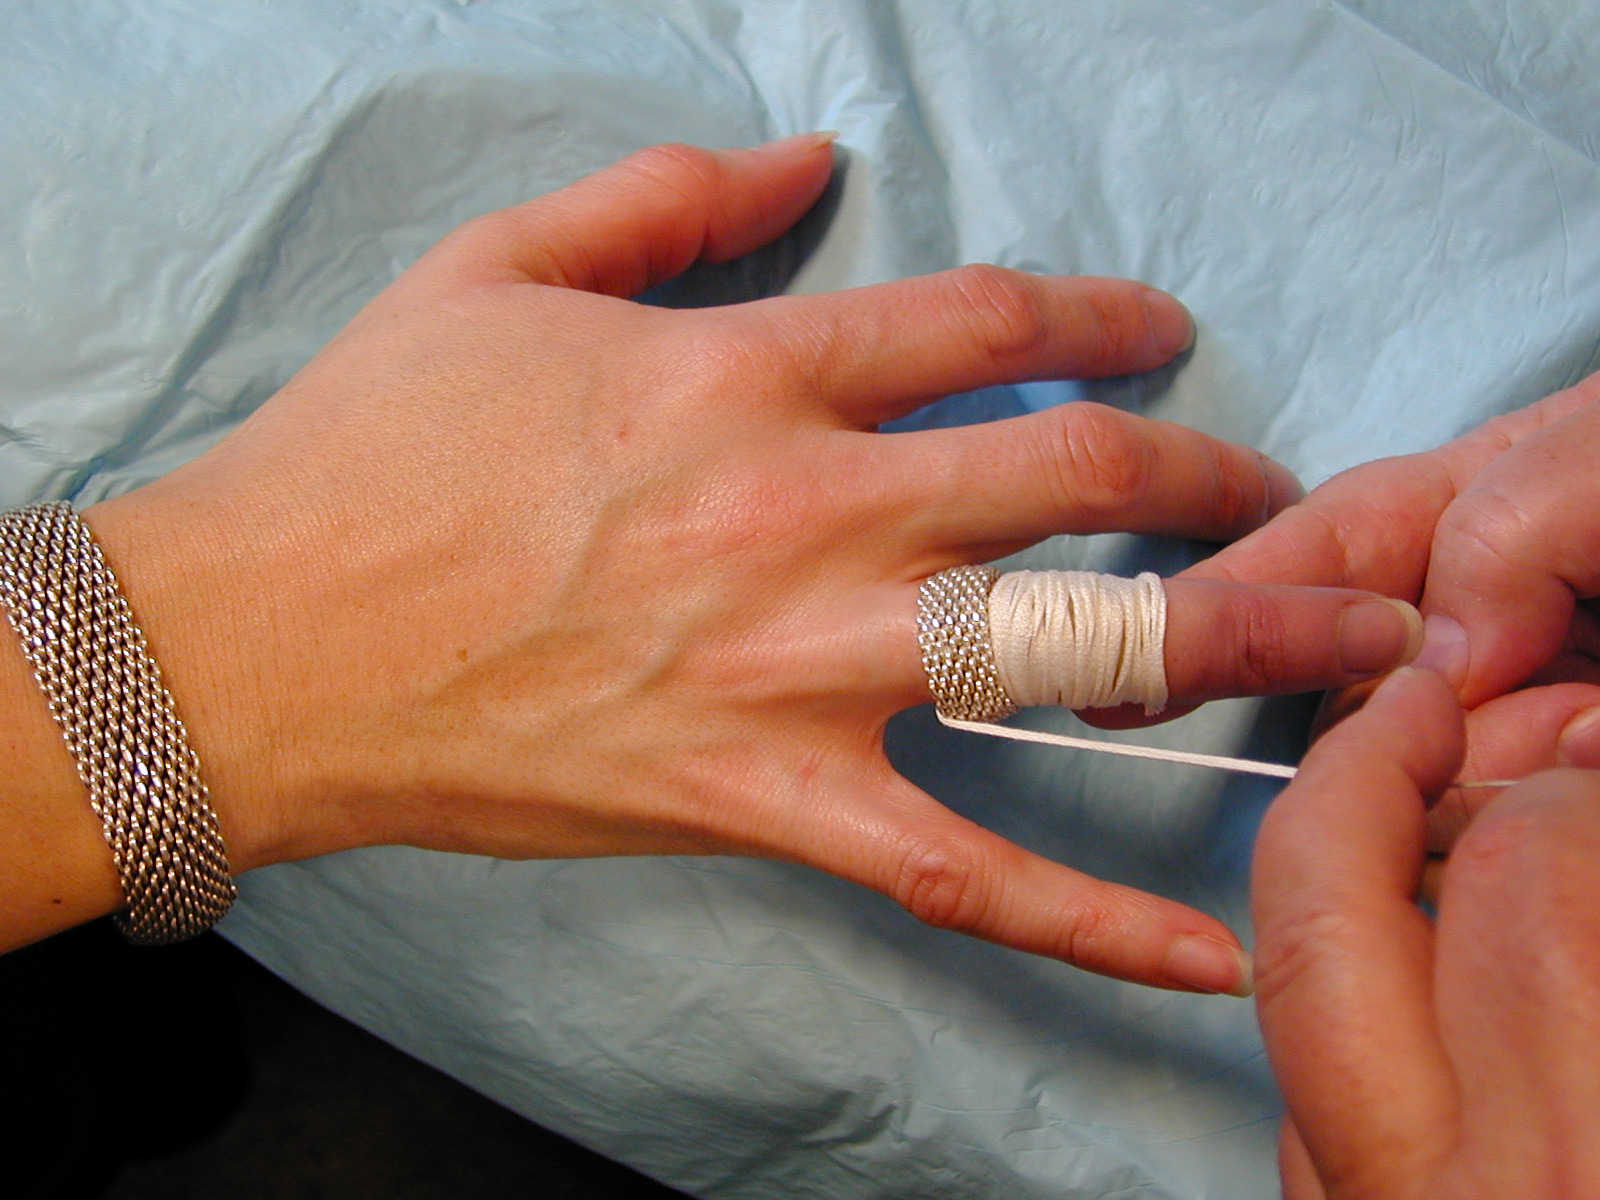 |
Step 3: Grasp the proximal end of the umbilical tape and pull longitudinally along the long axis of the finger. If done properly, the tape will unwind around the edge of the ring, pulling it distally along the portion of the finger compressed by the tape. Note that a very rough edged ring or one with multiple sharp protrusions will make this technique very difficult to perform. You may need to repeat the same procedure several times if the finger is long or very swollen. |
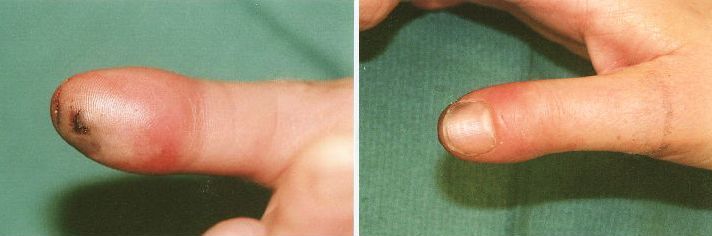 |
|
Prior to incision; note the tense, erythematous volar distal phalanx.
|
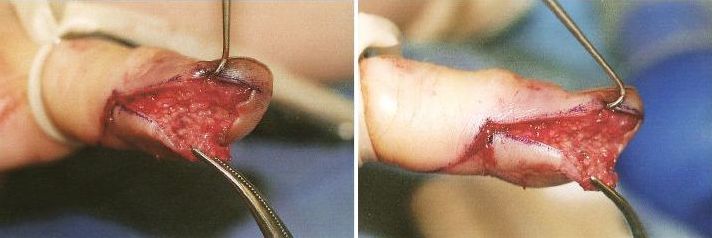 |
|
Post incision; note the extensive undermining required to open the mutiple “compartments” formed by the fibrous septa between volar fat pad and periosteum of the distal phalanx.
|
| Technique: After performing a digital block (consider using a long acting local anesthetic such as bupivicaine for the block, since this is a painful infection), make a longitudinal incision using a #15 blade that intersects the area of maximal tenderness or fluctuance. Note that incisions near the lateral finger need to be made within a few millimeters of the nail fold in order to avoid the distal digital nerve bundle. The incision needs to be deep enough to open the loculations created by the septa of the volar pad. Gently probe the incision with a small hemostat and break up any adhesions, and irrigate the wound. DO NOT CROSS THE DISTAL FLEXOR CREASE WITH YOUR INCISION AS THIS WILL INCREASE THE RISK OF PROXIMAL SPREAD OF THE INFECTION. Pack the wound loosely with sterile gauze and apply a bulky dressing. |
A long fishmouth or hockey stick incision or through-and-through bilateral longitudinal incision may increase the risk of digital nerve injury. 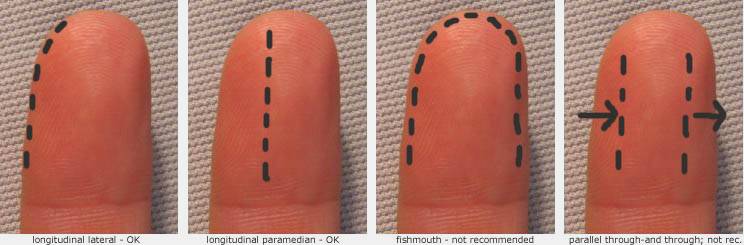
Potential Complications:
Overagressive or improperly placed incisions can result in skin necrosis, tenosynovitis, distal digital nerve injury, or septic arthritis.
Insect Stings; Infection (prob. not) or Just a Significant Local Reaction?
 |
|
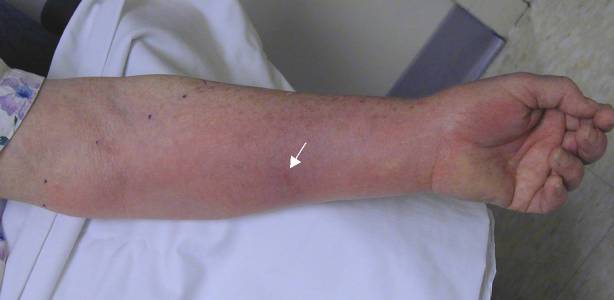
Case 1. Patient was stung on left forearm (arrow points to envenomation site) 38 hours prior.
|
 |
|
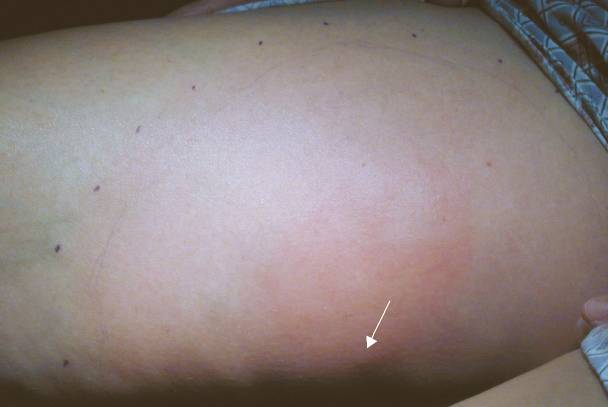
Case 2. Patient was stung on left thigh (arrow points to envenomation site) 32 hours prior.
|
|
|
|
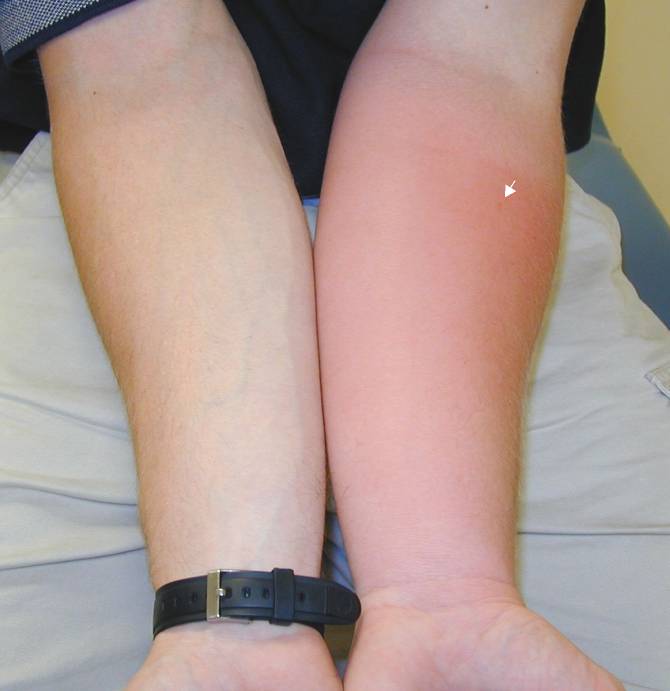
Case 3. Patient was stung on left forearm (arrow points to envenomation site) 28 hours prior.
|
| Discussion: In each of these cases, the patient was seen in the ED and started on antibiotics, was returning as requested for follow up. All were good historians and clearly saw the insect that stung them. All of them reported that itching predominated over pain, none had had any fever, and each felt otherwise well. Antibiotics were stopped and the patients were treated with local care, elevation, and diphenhydramine as needed for itching. On telephone follow up, all patients reported complete resolution without complications within a week. |
The Take Home: True infections are rare in cases of hymenoptera envenomations of a normal (non immunocompromised) host. Patients with a cellulitis will almost always state that pain predominates over pruritis (especially if the cellulitis were to be as extensive as those pictured above), in contrast to the pattern in these patients. The absence of fever or other constitutional symptoms also makes an acute infectious process less likely.
Oral Nerve Block:
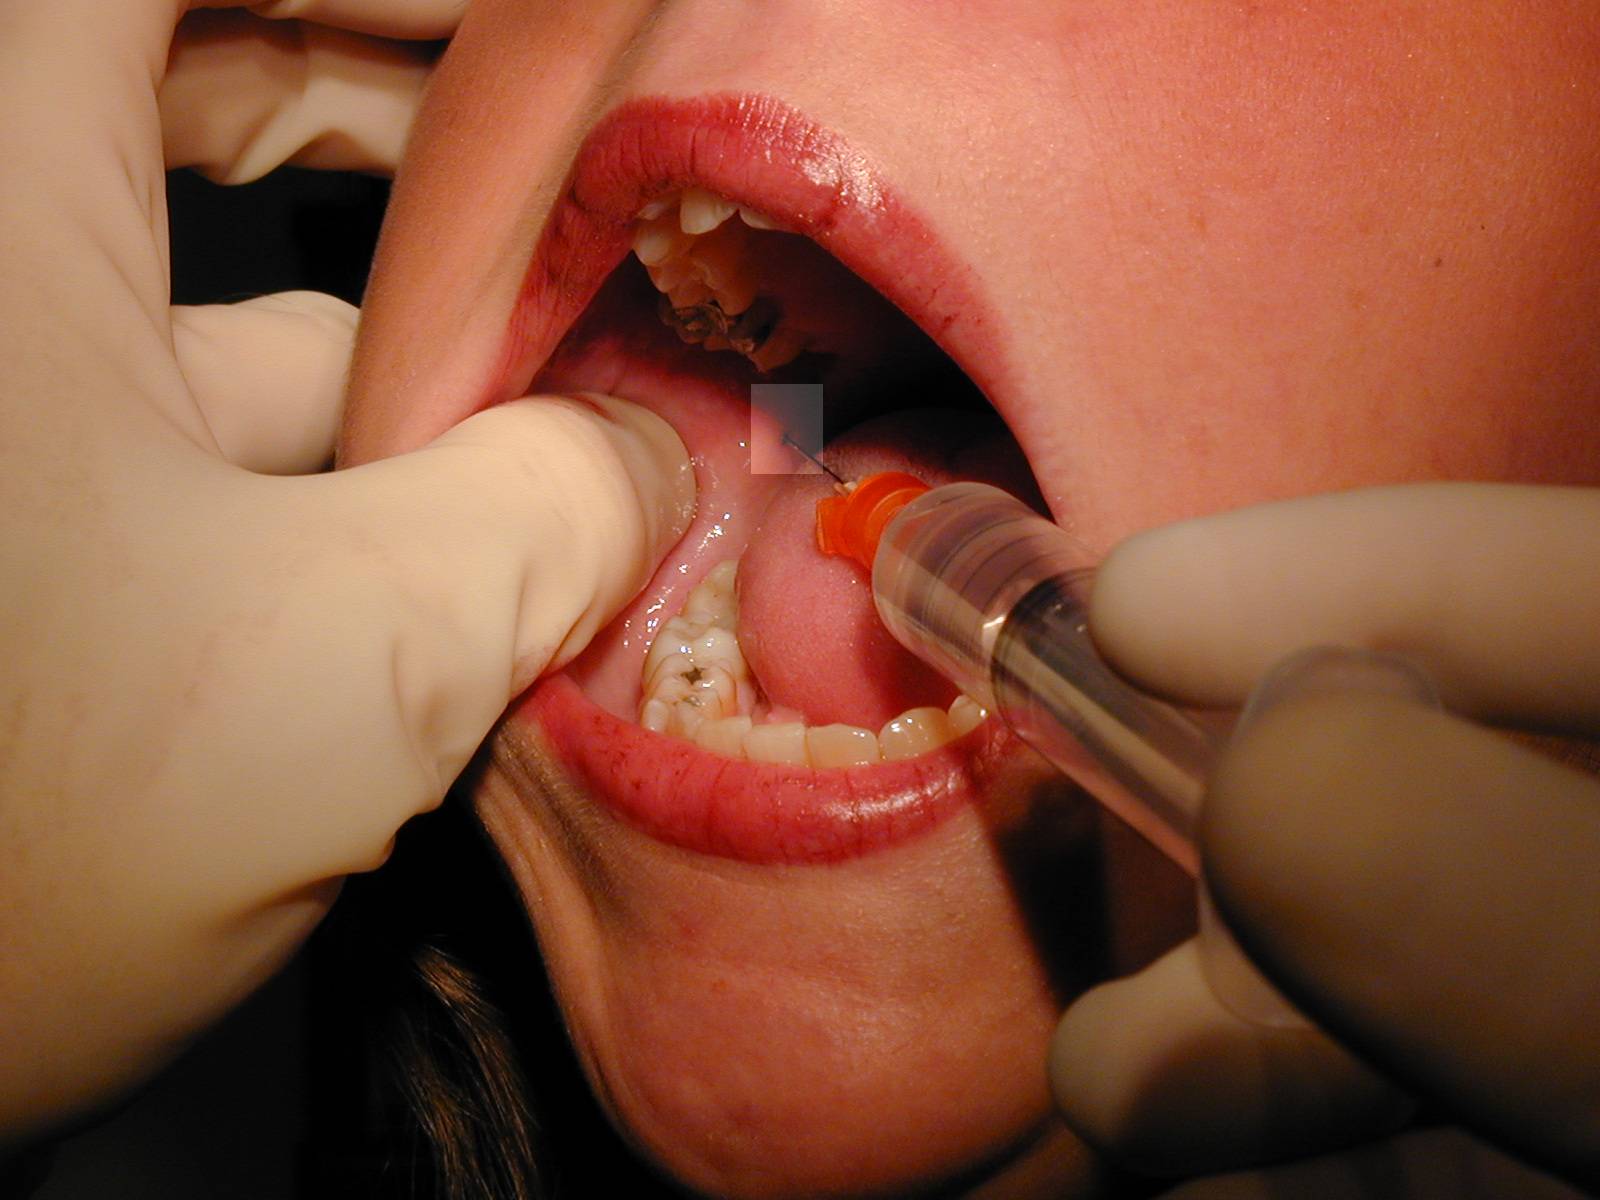 |
 Path of the needle from over the opposite second bicuspid to area adjacent to mandibular foramen. Path of the needle from over the opposite second bicuspid to area adjacent to mandibular foramen. |
| Technique: For a right sided block, place the tip of your left thumb up against the anterior edge of the ramus of the mandible. Insert the needle aligned so that the barrel is atop the 1st mandibular biscupid on the opposite side and the insertion is at a point that bisects the vertical plane of the thumbnail about 1.5 cm beyond the distal edge of the nail. Slowly advance until you hit bone (approx. 2 cm), back off 1-2 mm, aspirate, and if no blood, inject several cc of anesthetic. |
| Area of anesthesia : All mandibular teeth to the midline on the side of injection, supporting bone and periosteum, floor of the mouth and lingual gingiva on same side, often lingual nerve on that side (anterior 2/3 of tongue). |
Possible complications include:
Rarely:
|
Much of this handout was taken directly from these very cogent and pertinent sources:
Wound Closure: Choosing Optimal Methods and Materials by Richard M. Stillman in an ER Reports from May 11, 1981 (vol. 2 #10), and Controversial Issues in Clinical Management of the Simple Wound by WA Berk, RD Welch, and BF Bock in Annals of Emergency Medicine from January 1992 (vol. 21: 72-80)
Lecture outline – Biology of Wounds and Wound Repair by Robert A. Rosen, MD, FACEP
Lots of diagrams came from Bob Simon and Barry Brenner’s Emergency Procedures and Techniques, 2nd edition, Williams and Wilkins 1987
Many thanks to these fine authors for their work and inspiration!
I would also highly recommend the following books:
Wounds and Lacerations – Emergency Care and Closure by Alexander L. Trott, M.D., © Mosby; 2nd edition (January 15, 1997)
Lacerations and Acute Wounds by Drs. Adam Singer, Frederick Schiavone, and Jonathan Burstein,
© FA Davis (December 2001)
References:
1. The Healing Hand: Man and Wound in the Ancient World. Majno G. Harvard University Press, Cambridge, Massachusetts 1975
2. Atta HM, Edwin Smith Surgical Papyrus: The Oldest Known Surgical Treatise, Am Surgeon, Dec 1999; 65:1190-1192.
3. Perelman VS, Francis GJ, Rutledge T, Foote J, Martino F, Dranitsaris G. Sterile Versus Nonsterile Gloves for Repair of Uncomplicated Lacerations in the Emergency Department: A Randomized Controlled Trial. Ann Emerg Med 2004;43:362-370.
4. Ruthman JC, Hendricksen D, Miller RF, et al. Effect of cap and mask on Infection Rates in Wounds
Sutured in the Emergency Department. Ill Med J. 1984;165:397-399.
5. Brogan GX Jr, Giarrusso E, Hollander JE, Cassara G, Maranga MC, Thode HC. Comparison of plain, warmed, and buffered lidocaine for anesthesia of traumatic wounds. Ann Emerg Med 1995;26:121-5.
6. Tetzlaff JE. The pharmacology of local anesthetics. Anesthesiol Clin North Am 2000;18:217-33
7. Colaric KB, Overton DT, Moore K. Pain reduction in lidocaine administration through buffering and warming. Am J Emerg Med 1998;16:353-6.
8. Cousins MJ, Mather LE. Clinical pharmacology of local anesthetics. Anesth Intens Care 1980;8:257-77.
9. Forsch RT, Little SH, and Williams C. Laceration Repair: A Practical Approach. Am Fam Physician 2017 May 15;95(10):628-636
11. Weiss BP, Strassburg MA, Feeley JC. Tetanus and diphtheria immunity in an elderly population in Los Angeles County. Am J Public Health 1983; 73:802-4.
13. Crossley K, Irvine P, Warren JB, Lee BK, Mead K. Tetanus and diphtheria immunity in urban Minnesota adults. JAMA 1979;242:2298-3000.
14. Ruben FL, Nagel J, Fireman P. Antitoxin responses in the elderly to tetanus-diphtheria (Td) immunization. Am J Epidemiol 1978;108:145-9.
15. Koblin BA, Townsend TR. Immunity to diphtheria and tetanus in inner-city women of childbearing age. Am J Public Health 1989;79: 1297-8. CDC. Tetanus — United States, 1987 and 1988. MMWR 1990;39:37-41.
16.Berk WA, Welch RD, and Bock BF. Controversial Issues in Clinical Management of the Simple Wound. Ann Emerg Med 1992 Jan;21(1):72-80.
17. Berk WA, Osbourne DD, and Taylor DD. Evaluation of the “Golden Period” for Wound Repair: 204 cases from a third-world emergency department. Ann Emerg Med 1988;17:496-500.
18. Bartfield JM, Jandreau SW, Raccio-Robak N. Randomized trial of diphenhydramine versus benzyl alcohol with epinephrine as an alternative to lidocaine local anesthesia. Ann Emerg Med 1998;32:650-4.
19. Singer AJ, Hollander JE, and Quinn JV: Evaluation and Management of Traumatic Lacerations. NEJM 1997; 337(16):1142-1148
20. Hollander JE and Singer AJ: Laceration Management. Ann Emerg Med 1999; 34(3): 356-367
21. Scarfone RJ, Jasani M, and Gracely E: Pain of Local Anesthetics: Rate of Administration and Buffering. Ann Emerg Med 1998; 31(1): 36-40
22.Hollander JE, Richman PB, Werblud M et al: Irrigation in Facial and Scalp Lacerations: Does It Alter Outcome? Ann Emerg Med 1998; 31(1): 73-77
23. Quinn J, Wells, G, Sutcliffe T et al. A Randomized Trial Comparing Octylcyanoacrylate Tissue Adhesive and Sutures in the Management of Lacerations. JAMA. 1997;277:1527-1530
24. Hollander JE, Singer AJ. Application of Tissue Adhesives: Rapid Attainment of Proficiency. Acad Emerg Med. 1998;5:1012-1017
25. Quinn J, Wells G, Sutcliffe T et al. Tissue adhesive versus suture wound repair at 1 year: randomized clinical trial correlating early, 3-month, and 1-year cosmetic outcome. Ann Emerg Med 1998 Dec;32(6):645-649
26. Edlich RF, Rodeheaver GT, Morgan RF, Berman DE, Thacker JG. Principles of emergency wound management. Ann Emerg Med 1988;17:284-302
27. Moscati RM; Reardon RF; Lerner EB; Mayrose J. Wound Irrigation with Tap Water. Acad Emerg Med 1998 Nov;5(11):1076-80
28. Stevenson TR, Thacker JG, Rodeheaver GT et al. Cleansing the Traumatic Wound with High Pressure Syringe Irrigation. JACEP 5: 17-21, 1976
29. Stevens DL, Bisno AL, Chambers HF et al. Practice Guidelines for the Diagnosis and Management of Skin and Soft Tissue Infections: 2014 Update by the Infectious Diseases Society of America. Clinical Infectious Diseases, Volume 59, Issue 2, 15 July 2014, Pages e10–e52
30. Murray CK. Field Wound Care: Prophylactic Antibiotics. Wilderness and Environmental Medicine. 28: S90–S102, 2017
32. Singer AJ. Hair apposition for scalp lacerations. Ann Emerg Med. July 2002;40:27-29